
Banana Pudding Cheesecake Creation: A Dreamy Dessert Delight!

Introduction to Banana Pudding Cheesecake Creation
Welcome to my kitchen, where today I’m excited to share my Banana Pudding Cheesecake Creation! This dessert is a delightful blend of creamy cheesecake and the nostalgic flavors of classic banana pudding. If you’re a busy mom or professional, you know how precious time can be. This recipe is not only quick to whip up but also a guaranteed crowd-pleaser. Imagine serving this dreamy dessert at your next gathering, and watching everyone’s faces light up with joy. Trust me, this is one treat you won’t want to miss!
Why You’ll Love This Banana Pudding Cheesecake Creation
This Banana Pudding Cheesecake Creation is a game-changer for busy days. It’s incredibly easy to make, requiring just a handful of ingredients and minimal prep time. The creamy texture and sweet banana flavor will transport you back to childhood, making it a comforting dessert for all ages. Plus, it’s perfect for impressing guests without spending hours in the kitchen. Who wouldn’t love a dessert that’s both simple and scrumptious?
Ingredients for Banana Pudding Cheesecake Creation
Gathering the right ingredients is the first step to creating your Banana Pudding Cheesecake Creation. Here’s what you’ll need:
- Graham cracker crumbs: These form the base of your cheesecake crust, adding a sweet crunch.
- Unsalted butter: Melted butter binds the crumbs together, giving the crust a rich flavor.
- Cream cheese: The star of the show! It provides that creamy, luscious texture we all love in cheesecake.
- Granulated sugar: This sweetens the cheesecake, balancing the flavors beautifully.
- Vanilla extract: A splash of vanilla enhances the overall taste, making it even more delightful.
- Whipped cream: Light and airy, it adds a fluffy texture to the cheesecake mixture.
- Ripe bananas: Fresh bananas bring that classic banana pudding flavor, making this dessert truly special.
- Instant banana pudding mix: This is the secret ingredient that intensifies the banana flavor and adds creaminess.
- Milk: Used to prepare the pudding mix, it helps achieve the perfect consistency.
- Mini vanilla wafers: These are optional but add a fun crunch and extra flavor when layered in the cheesecake.
For exact measurements, check the bottom of the article where you can find everything listed for easy printing. Feel free to get creative! You can swap out the graham cracker crumbs for crushed cookies or use a dairy-free cream cheese for a lighter version. The possibilities are endless!
How to Make Banana Pudding Cheesecake Creation
Now that you have your ingredients ready, let’s dive into the fun part: making your Banana Pudding Cheesecake Creation! Follow these simple steps, and you’ll have a dessert that’s sure to impress.
Step 1: Preheat the Oven
First things first, preheat your oven to 325°F (160°C). Preheating is crucial because it ensures that your crust bakes evenly. A hot oven helps the crust set perfectly, giving you that delightful crunch we all love.
Step 2: Prepare the Crust
In a mixing bowl, combine your graham cracker crumbs with the melted butter. Stir until the crumbs are fully coated. This mixture should resemble wet sand. Next, press it firmly into the bottom of a springform pan. Make sure it’s even; this will be the foundation of your cheesecake!
Step 3: Bake the Crust
Pop the crust into the preheated oven and bake for about 10 minutes. This short baking time helps to set the crust. Once it’s done, take it out and let it cool completely. A cool crust is essential for layering the creamy filling later.
Step 4: Make the Cream Cheese Mixture
In a large mixing bowl, beat the softened cream cheese and granulated sugar together until smooth. This should take about 2-3 minutes. You want a creamy texture without any lumps. The cream cheese is what gives your cheesecake that rich, velvety feel.
Step 5: Prepare the Banana Pudding
In another bowl, prepare the instant banana pudding mix according to the package instructions, using milk. Whisk it until it’s thick and creamy. This step is where the banana flavor really shines, making your cheesecake irresistible!
Step 6: Combine Mixtures
Now, gently fold the whipped cream into the cream cheese mixture. Be careful not to deflate the whipped cream; you want to keep that light, airy texture. Once combined, fold in the prepared banana pudding. This creates a luscious filling that’s bursting with flavor.
Step 7: Layer the Ingredients
On your cooled crust, layer the sliced bananas and mini vanilla wafers. This adds a delightful crunch and extra banana flavor. Spread them evenly, making sure every bite will have a bit of that deliciousness.
Step 8: Pour the Cheesecake Mixture
Now it’s time to pour the cheesecake mixture over the layered bananas and wafers. Use a spatula to spread it evenly across the top. This is where the magic happens, as the layers come together to create a beautiful dessert.
Step 9: Chill the Cheesecake
Finally, cover the cheesecake and chill it in the refrigerator for at least 4 hours, or until it’s set. Chilling is essential; it allows the flavors to meld and the cheesecake to firm up. Trust me, the wait will be worth it!
Tips for Success
- Use room temperature cream cheese for a smoother mixture.
- Don’t skip the chilling time; it’s crucial for the cheesecake to set properly.
- For a fun twist, add a sprinkle of cinnamon to the crust.
- Layer extra banana slices on top before serving for a beautiful presentation.
- Keep leftovers covered in the fridge to maintain freshness.
Equipment Needed
- Springform pan: Ideal for cheesecakes, but a regular pie dish works too.
- Mixing bowls: Use any size; just make sure they’re sturdy.
- Electric mixer: A hand mixer is great, but a whisk will do in a pinch.
- Spatula: Essential for folding and spreading the cheesecake mixture.
- Whisk: Handy for mixing the pudding and cream cheese.
Variations
- Chocolate Banana Pudding Cheesecake: Add cocoa powder to the cream cheese mixture for a chocolate twist.
- Nutty Crunch: Incorporate crushed nuts, like pecans or walnuts, into the crust for added texture.
- Dairy-Free Option: Substitute cream cheese with a dairy-free alternative and use coconut whipped cream.
- Banana Foster Style: Drizzle caramel sauce over the top before serving for a decadent touch.
- Fruit Medley: Mix in other fruits like strawberries or blueberries for a colorful and flavorful variation.
Serving Suggestions
- Pair your Banana Pudding Cheesecake Creation with a dollop of whipped cream on top for extra indulgence.
- Serve alongside fresh fruit, like strawberries or blueberries, to add a pop of color.
- For drinks, consider a chilled glass of sweet iced tea or a creamy vanilla latte.
- Garnish with mint leaves for a refreshing touch and beautiful presentation.
FAQs about Banana Pudding Cheesecake Creation
Can I make this Banana Pudding Cheesecake Creation ahead of time?
Absolutely! In fact, making it a day in advance allows the flavors to meld beautifully. Just keep it covered in the refrigerator until you’re ready to serve.
What can I use instead of cream cheese?
If you’re looking for a lighter option, you can use Greek yogurt or a dairy-free cream cheese alternative. Both will still give you that creamy texture!
How do I store leftovers?
Store any leftovers in an airtight container in the refrigerator. It should stay fresh for up to three days, but trust me, it won’t last that long!
Can I freeze the Banana Pudding Cheesecake Creation?
Yes, you can freeze it! Just make sure to wrap it tightly in plastic wrap and then foil. Thaw it in the fridge overnight before serving.
What can I serve with this cheesecake?
This cheesecake pairs wonderfully with fresh fruit, whipped cream, or even a drizzle of chocolate sauce. It’s a versatile dessert that complements many flavors!
Final Thoughts
Creating this Banana Pudding Cheesecake Creation is more than just baking; it’s about bringing joy to your table. The creamy layers and sweet banana flavor evoke warm memories, making it a perfect dessert for family gatherings or cozy nights in. I love how this recipe allows me to share a piece of my heart with loved ones, all while being simple enough for any busy day. So, roll up your sleeves, gather your ingredients, and let this delightful cheesecake become a cherished part of your dessert repertoire. Trust me, every bite will be worth the effort!
Print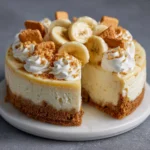
Banana Pudding Cheesecake Creation: A Dreamy Dessert Delight!
- Total Time: 4 hours 40 minutes
- Yield: 8 servings 1x
- Diet: Vegetarian
Description
A delicious and creamy banana pudding cheesecake that combines the flavors of classic banana pudding with a rich cheesecake.
Ingredients
- 1 ½ cups graham cracker crumbs
- ½ cup unsalted butter, melted
- 2 cups cream cheese, softened
- 1 cup granulated sugar
- 1 teaspoon vanilla extract
- 2 cups whipped cream
- 2 ripe bananas, sliced
- 1 package instant banana pudding mix
- 2 cups milk
- 1 cup mini vanilla wafers
Instructions
- Preheat the oven to 325°F (160°C).
- In a bowl, mix graham cracker crumbs and melted butter until combined. Press into the bottom of a springform pan to form the crust.
- Bake the crust for 10 minutes, then let it cool.
- In a large mixing bowl, beat the cream cheese and sugar until smooth.
- Add vanilla extract and mix well.
- In another bowl, prepare the banana pudding mix with milk according to package instructions.
- Fold the whipped cream into the cream cheese mixture, then gently fold in the prepared banana pudding.
- Layer sliced bananas and mini vanilla wafers on top of the cooled crust.
- Pour the cheesecake mixture over the bananas and wafers, spreading it evenly.
- Chill in the refrigerator for at least 4 hours or until set.
- Serve chilled and enjoy your Banana Pudding Cheesecake!
Notes
- For a richer flavor, use ripe bananas.
- Can be topped with additional whipped cream and banana slices before serving.
- Store leftovers in the refrigerator for up to 3 days.
- Prep Time: 30 minutes
- Cook Time: 10 minutes
- Category: Dessert
- Method: Baking and Chilling
- Cuisine: American
Nutrition
- Serving Size: 1 slice
- Calories: 350
- Sugar: 20g
- Sodium: 200mg
- Fat: 22g
- Saturated Fat: 12g
- Unsaturated Fat: 8g
- Trans Fat: 0g
- Carbohydrates: 30g
- Fiber: 1g
- Protein: 4g
- Cholesterol: 60mg
Keywords: Banana Pudding, Cheesecake, Dessert, Creamy, Easy Recipe