
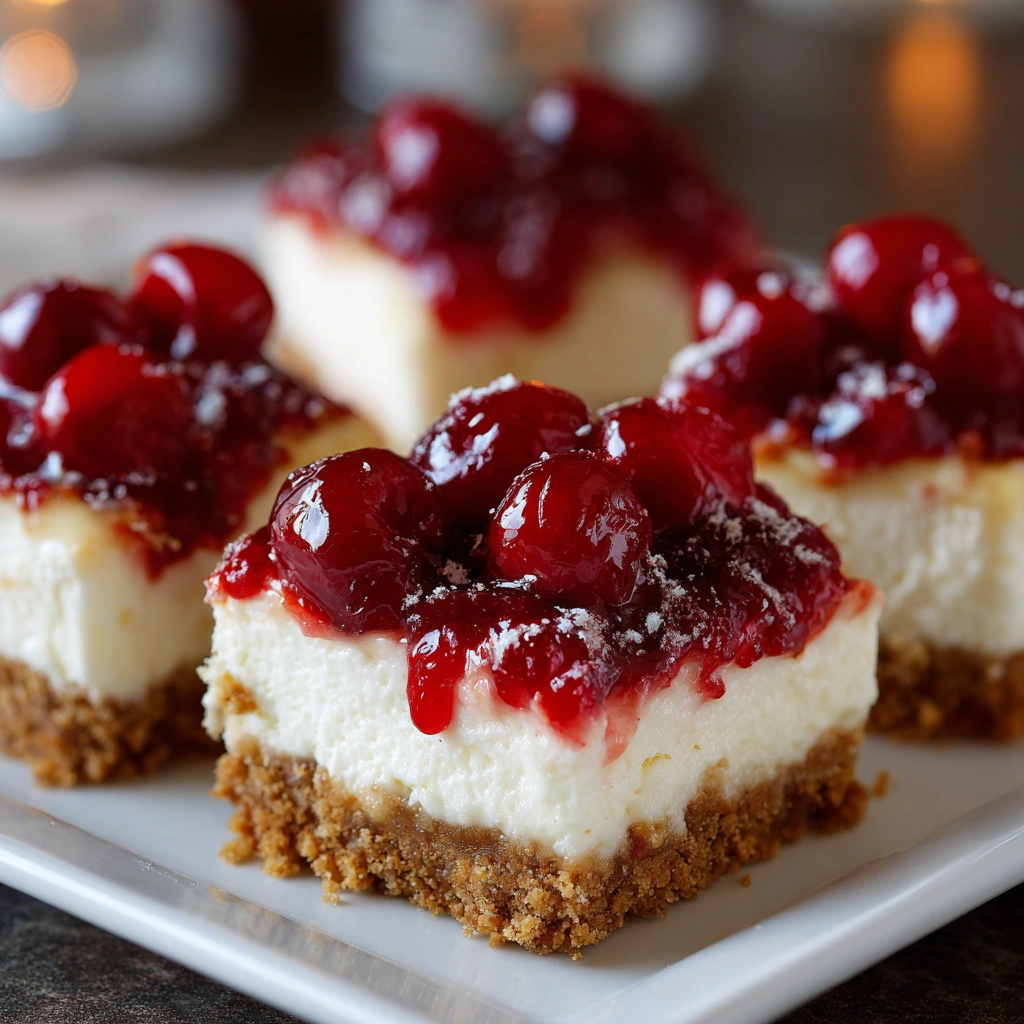
Christmas Cherry Cheesecake Bars That Delight Everyone
Introduction to Christmas Cherry Cheesecake Bars
As the holiday season approaches, I find myself dreaming of festive treats that bring joy to my family and friends. That’s where these Christmas Cherry Cheesecake Bars come in! They’re not just a dessert; they’re a delightful way to spread cheer during gatherings. With their creamy filling and vibrant cherry topping, they’re sure to impress even the pickiest eaters. Plus, they’re quick to whip up, making them a perfect solution for busy days filled with holiday hustle. Trust me, these bars will become a cherished tradition in your home!
Why You’ll Love This Christmas Cherry Cheesecake Bars
These Christmas Cherry Cheesecake Bars are a holiday miracle wrapped in a delicious package! They’re incredibly easy to make, which is a lifesaver during the bustling season. The creamy cheesecake pairs perfectly with the sweet cherry topping, creating a flavor explosion that will have everyone coming back for seconds. Plus, they can be made ahead of time, giving you more moments to enjoy with loved ones. What’s not to love?
Ingredients for Christmas Cherry Cheesecake Bars
Gathering the right ingredients is the first step to creating these delightful Christmas Cherry Cheesecake Bars. Here’s what you’ll need:
- Graham cracker crumbs: These form the base of your crust, providing a sweet and crunchy texture.
- Unsalted butter: Melted butter binds the crumbs together, adding richness to the crust.
- Cream cheese: The star of the show! Softened cream cheese gives the bars their creamy, dreamy filling.
- Granulated sugar: This sweetens the cheesecake, balancing the tanginess of the cream cheese.
- Vanilla extract: A splash of vanilla enhances the flavor, making each bite more aromatic and delicious.
- Eggs: They help set the filling, giving it that perfect cheesecake texture.
- Cherry pie filling: This luscious topping adds a pop of color and sweetness, making the bars festive and fun.
For those looking to switch things up, consider using digestive biscuits instead of graham crackers for a different flavor. You can also swap the cherry pie filling for other fruits like blueberry or strawberry, depending on your preference. Remember, the exact quantities for these ingredients are listed at the bottom of the article, ready for you to print out and take to the kitchen!
How to Make Christmas Cherry Cheesecake Bars
Now that you have your ingredients ready, let’s dive into the fun part—making these Christmas Cherry Cheesecake Bars! Follow these simple steps, and you’ll have a festive treat that’s sure to impress.
Step 1: Preheat the Oven
First things first, preheat your oven to 325°F (163°C). Preheating is crucial because it ensures even baking. If you skip this step, your cheesecake bars might not set properly. Trust me, no one wants a gooey mess when they’re expecting a creamy delight!
Step 2: Prepare the Crust
In a mixing bowl, combine your graham cracker crumbs and melted butter. Stir until the crumbs are fully coated. This mixture should resemble wet sand. Now, press it firmly into the bottom of a greased 9×13 inch baking dish. Pressing it down well is key; it creates a sturdy base for your cheesecake filling. A firm crust will hold everything together beautifully!
Step 3: Make the Cheesecake Filling
In another bowl, beat the softened cream cheese, granulated sugar, and vanilla extract until smooth. This is where the magic happens! The cream cheese should be creamy and free of lumps. Next, add the eggs one at a time, mixing well after each addition. This step is important because it helps incorporate air, giving your cheesecake that light, fluffy texture.
Step 4: Assemble and Bake
Pour the luscious cream cheese mixture over your prepared crust. Spread it evenly with a spatula. Now, it’s time to bake! Place the dish in the preheated oven and bake for 30-35 minutes. To check for doneness, gently shake the pan; the center should be set but still slightly jiggly. Remember, it will firm up as it cools!
Step 5: Add the Cherry Topping
Once your cheesecake bars are baked, let them cool completely in the pan. After they’ve cooled, spread the cherry pie filling evenly on top. This vibrant topping not only adds flavor but also makes your bars look festive and inviting. It’s like a cherry-red bow on a beautifully wrapped gift!
Step 6: Chill Before Serving
Finally, chill your cheesecake bars in the refrigerator for at least 2 hours. Chilling is essential for the best texture and flavor. It allows the filling to set perfectly, making each bite a creamy dream. Trust me, the wait will be worth it!
Tips for Success
- Use room temperature cream cheese for a smoother filling.
- Don’t skip the chilling step; it enhances flavor and texture.
- For a cleaner cut, use a sharp knife dipped in hot water.
- Feel free to add a sprinkle of cinnamon to the crust for extra warmth.
- Double the recipe for larger gatherings; they’ll disappear fast!
Equipment Needed
- 9×13 inch baking dish: A standard size for these bars; you can use a glass or metal dish.
- Mixing bowls: A couple of medium-sized bowls will do the trick.
- Electric mixer: For a smooth filling; a whisk works too, but it’ll take longer.
- Spatula: Essential for spreading the filling evenly.
- Sharp knife: For cutting the bars into perfect squares.
Variations
- Chocolate Cherry Cheesecake Bars: Add cocoa powder to the crust for a chocolatey twist that pairs beautifully with the cherry topping.
- Gluten-Free Option: Substitute graham cracker crumbs with gluten-free cookies or almond flour for a delicious gluten-free treat.
- Low-Sugar Version: Use a sugar substitute like Stevia or erythritol to reduce the sugar content without sacrificing flavor.
- Fruit Medley: Swap out the cherry pie filling for a mix of your favorite fruits, like blueberries and raspberries, for a colorful variation.
- Nutty Crust: Add crushed nuts, like pecans or almonds, to the crust for an extra crunch and flavor boost.
Serving Suggestions
- Pair these bars with a dollop of whipped cream for added creaminess.
- Serve alongside a warm cup of spiced apple cider for a cozy touch.
- Garnish with fresh mint leaves for a pop of color and freshness.
- Present on a festive platter to impress your guests.
- Consider adding a sprinkle of crushed nuts for extra texture.
FAQs about Christmas Cherry Cheesecake Bars
Can I make these Christmas Cherry Cheesecake Bars ahead of time?
Absolutely! These bars can be made a day in advance. Just be sure to chill them in the refrigerator overnight. This allows the flavors to meld beautifully, making them even more delicious!
What can I use instead of cherry pie filling?
If cherries aren’t your thing, feel free to swap in other fruit fillings! Blueberry, strawberry, or even a mixed berry topping can add a delightful twist to your cheesecake bars.
How do I store leftovers?
Store any leftover bars in an airtight container in the refrigerator. They’ll stay fresh for up to three days, but I doubt they’ll last that long!
Can I freeze these cheesecake bars?
Yes, you can freeze them! Just wrap the bars tightly in plastic wrap and then in aluminum foil. They’ll keep well for up to three months. Thaw them in the fridge before serving.
What’s the best way to cut these bars?
For clean cuts, use a sharp knife dipped in hot water. Wipe the knife clean between cuts for perfectly shaped squares. It’s all about presentation!
Final Thoughts
Making these Christmas Cherry Cheesecake Bars is more than just baking; it’s about creating memories. The joy of sharing a slice with loved ones, watching their faces light up with delight, is truly priceless. Each bite is a reminder of the warmth and love that fills our homes during the holidays. Plus, the ease of preparation means you can spend less time in the kitchen and more time enjoying the festivities. So, gather your ingredients, roll up your sleeves, and let the holiday spirit inspire you. These bars are sure to become a beloved tradition in your family!
Print
Christmas Cherry Cheesecake Bars That Delight Everyone
- Total Time: 2 hours 55 minutes
- Yield: 12 servings 1x
- Diet: Vegetarian
Description
Delicious and festive cheesecake bars topped with cherry filling, perfect for Christmas gatherings.
Ingredients
- 1 ½ cups graham cracker crumbs
- ½ cup unsalted butter, melted
- 2 cups cream cheese, softened
- 1 cup granulated sugar
- 1 teaspoon vanilla extract
- 2 large eggs
- 1 can cherry pie filling
Instructions
- Preheat the oven to 325°F (163°C).
- In a bowl, mix graham cracker crumbs and melted butter until combined.
- Press the mixture into the bottom of a greased 9×13 inch baking dish.
- In another bowl, beat cream cheese, sugar, and vanilla until smooth.
- Add eggs one at a time, mixing well after each addition.
- Pour the cream cheese mixture over the crust in the baking dish.
- Bake for 30-35 minutes or until set.
- Let cool, then spread cherry pie filling on top.
- Chill in the refrigerator for at least 2 hours before serving.
Notes
- For a festive touch, garnish with whipped cream and additional cherries.
- Store leftovers in the refrigerator for up to 3 days.
- Prep Time: 20 minutes
- Cook Time: 35 minutes
- Category: Dessert
- Method: Baking
- Cuisine: American
Nutrition
- Serving Size: 1 bar
- Calories: 250
- Sugar: 20g
- Sodium: 150mg
- Fat: 15g
- Saturated Fat: 9g
- Unsaturated Fat: 4g
- Trans Fat: 0g
- Carbohydrates: 30g
- Fiber: 1g
- Protein: 3g
- Cholesterol: 50mg
Keywords: Christmas, Cherry, Cheesecake, Bars, Dessert