
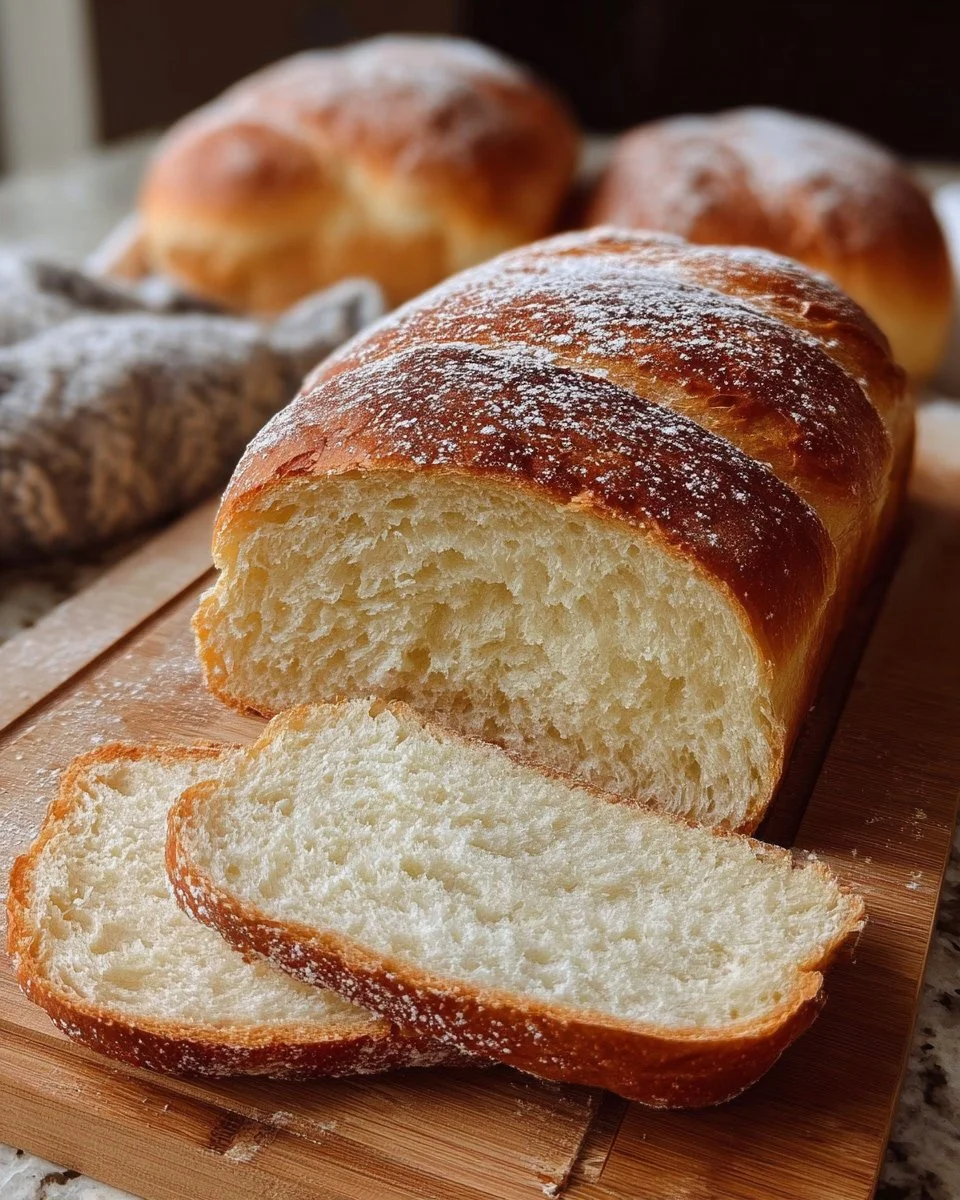
Homemade No-Knead Sandwich Bread
What could be more comforting than the aroma of freshly baked bread wafting through your home? Imagine the golden crust crackling as you slice through, revealing a soft, airy interior that beckons with its fluffy texture. This is the experience that awaits you with our Homemade No-Knead Sandwich Bread, a delightful recipe that transforms simple ingredients into a warm, nourishing loaf perfect for any occasion.
As you gently tear off a warm piece, the steam escaping from the crumb dances in the air, enticing you to take that first glorious bite. You’ll experience the way the bread lightly cradles your favorite spreads, whether it’s a thick layer of creamy butter melting into the warm surface or a rich, tangy jam that contrasts beautifully with the bread’s subtle sweetness. The toasted edges provide a satisfying crunch, while the interior remains delectably tender, ready to embrace whatever culinary delights you choose to pair with it.
Why You’ll Love This Homemade No-Knead Sandwich Bread
This no-knead sandwich bread serves as the ultimate canvas for your culinary creativity. With its tender, supple crumb and golden, crackling crust, every slice offers a heavenly balance of flavor and texture that enhances your meals. Whether it’s a hearty breakfast sandwich piled high with eggs and avocado, or a comforting grilled cheese melted to perfection, this bread elevates ordinary moments into extraordinary ones.
You will adore how straightforward the recipe is, requiring minimal hands-on time while delivering maximum satisfaction. It’s a wonderful project that doesn’t demand special skills, making it accessible for bakers of all levels. The long fermentation process yields a nuanced flavor that rivals even the finest artisan breads found in bakeries. Plus, it effortlessly adapts to your serving needs, making it a must-have for family gatherings, picnics, or just a casual weekday lunch.
Preparation Phase & Tools to Use
Creating your own bread from the comfort of home requires only a few essential tools, all of which play a crucial role in perfecting your loaf.
- Mixing Bowl: A large, sturdy mixing bowl allows for ample space to mix dry and wet ingredients without spills.
- Wooden Spoon: An essential tool to mix your dough, it helps create a cohesive mixture without overworking the ingredients.
- Plastic Wrap or Towel: Covers the bowl during the long resting period, trapping warmth and moisture, crucial for developing flavor and texture.
- Floured Surface: Use a clean countertop or cutting board dusted with flour to shape your dough easily and prevent sticking.
- Dutch Oven: Key for creating a steam-rich environment, it mimics the conditions of a traditional bread oven, yielding a delightful crust.
- Wire Rack: Properly cools your bread after baking, allowing air circulation for a perfect finish.
Ingredients for Homemade No-Knead Sandwich Bread
- 3 cups all-purpose flour: This versatile flour provides the perfect base, yielding a soft, tender crumb. For a gluten-free alternative, consider a 1:1 gluten-free flour blend.
- 1 ½ teaspoons salt: Enhances flavor and strengthens the dough. Sea salt or kosher salt work well here.
- 1 teaspoon instant yeast: This helps the dough rise quickly during fermentation. Active dry yeast is a suitable substitute but may require a little extra activation time.
- 1 ½ cups warm water: The warmth of the water encourages yeast activity, contributing to the airy texture of the bread. Aim for around 110°F (43°C).
How to Make Homemade No-Knead Sandwich Bread
-
Mix Dry Ingredients: In a large bowl, whisk together the flour, salt, and yeast until everything is evenly combined. This ensures consistent flavor throughout the bread.
-
Combine with Water: Gradually add the warm water to the dry ingredients. Stir with a wooden spoon until the mixture forms a sticky dough that pulls away from the sides of the bowl. Don’t worry, it should be wet!
-
Rest for Flavor: Cover the bowl tightly with plastic wrap or a towel and let it sit at room temperature for 12-18 hours. Go ahead and set your timer; this is where the magic happens as the dough develops deep, complex flavors.
-
Shape the Dough: After resting, turn the dough out onto a floured surface. Using floured hands, gently shape the dough into a ball without overworking it. Handle it with love!
-
Second Rise: Allow the dough to rise uncovered for about one hour, or until it puffs up significantly. This step ensures that your loaf will be light and airy.
-
Preheat the Oven: Preheat your oven to 450°F (230°C). Place your Dutch oven inside so that it heats up along with the oven. This helps achieve that perfect crust.
-
Transfer the Dough: Carefully remove the hot Dutch oven and carefully place the dough inside. Cover with the lid to create steam, sealing in moisture and flavor.
-
Bake Covered: Bake the bread for 30 minutes covered. The steam will puff up your loaf beautifully.
-
Finish Baking: After 30 minutes, remove the lid and continue to bake for an additional 15-20 minutes. Watch as the crust turns a beautiful golden brown.
-
Cool and Slice: Let the bread cool on a wire rack for at least 30 minutes before slicing. This allows steam to escape and ensures a better texture when you cut into it.
Chef’s Notes & Helpful Tips
- Make-Ahead Tips: Embrace the flexibility! You can prepare the dough the night before and bake it fresh in the morning, making your breakfast feel like a special occasion.
- Cooking Alternatives: While the Dutch oven method creates a beautiful crust, you can also use a baking stone or place a shallow pan with water in the oven to create steam.
- Customization Ideas: Feel free to incorporate flavors and mix-ins such as herbs, spices, cheese, or seeds to truly make the recipe your own.
Common Mistakes to Avoid
- Overworking the Dough: Resist the urge to knead extensively. This recipe is designed to take advantage of long fermentation for gluten development.
- Inaccurate Measurements: Ensure you measure both your flour and water accurately. Excess flour can lead to a dense loaf.
- Skipping the Rising Times: Allow the dough to rise adequately. Rushing this step can lead to bread that is too tough and not airy.
What to Serve With Homemade No-Knead Sandwich Bread
- Classic Sandwiches: Layer turkey, lettuce, and tomato for a lunchtime favorite.
- Hearty Breakfasts: Use it for egg sandwiches or toasted alongside crispy bacon.
- Savory Toasts: Top with avocado, a sprinkle of salt, and red pepper flakes for a wholesome snack.
- Grilled Cheese: The soft interior and crispy crust make it the perfect choice for melty grilled cheese sandwiches.
- French Toast: Let this loaf shine at breakfast; slice it thick for delightful French toast.
- Charcuterie Boards: Pair with cured meats, cheeses, and olives for a sophisticated touch at gatherings.
- Soup Companion: Serve warm slices alongside bowls of hearty soup to soak up every delicious drop.
Storage & Reheating Instructions
- Fridge: Store leftover bread wrapped in plastic or a resealable bag at room temperature for up to 3 days.
- Freezer: For longer storage, slice the bread and freeze it in a zip-top bag for up to three months. Thaw on the counter or toast straight from frozen for best results.
- Reheating: Warm slices in a toaster or an oven for a few minutes to revive that fresh-baked flavor and warmth.
Estimated Nutrition Information
Approximately 120 calories per slice, with 2 grams of protein, 0.5 grams of fat, 1 gram of fiber, 24 grams of carbohydrates. Please note that values may vary based on specific brands and individual ingredients.
FAQs
Q1: Can I make this bread gluten-free?
A1: Yes! Use a gluten-free all-purpose flour blend suitable for baking, but make sure it contains xanthan gum or add it separately according to package instructions to help the dough hold its shape.
Q2: How can I achieve a softer crust?
A2: For a softer crust, brush the top of the loaf with butter immediately after it comes out of the oven. This not only softens the crust but also adds a lovely flavor.
Q3: Is it possible to use active dry yeast instead of instant yeast?
A3: Absolutely! You can use active dry yeast but remember to activate it in warm water for about 5-10 minutes before adding to the flour mixture.
Q4: Can I double the recipe?
A4: You can definitely double the recipe! Just ensure your mixing bowl is large enough to accommodate the extra ingredients and consider using two Dutch ovens for baking.
Q5: What should I do if my dough doesn’t rise?
A5: Check the freshness of your yeast and ensure your environment is warm enough for fermentation. If your yeast is expired, it may fail to activate.
With each slice of this homemade no-knead sandwich bread, you’ll invite warmth and heart into your kitchen and meals alike. The gentle ease of this recipe allows you to share love and comfort on your own terms. So, dust off your mixing bowl, and let this simple yet spectacular loaf shine as the centerpiece of your next culinary endeavor. Your family and friends will thank you, and trust me, your taste buds will be forever grateful. Happy baking!
Print
Homemade No-Knead Sandwich Bread
- Total Time: 12 hours 45 minutes
- Yield: 1 loaf 1x
- Diet: Vegetarian
Description
A delightful recipe for homemade no-knead sandwich bread that transforms simple ingredients into a warm, nourishing loaf perfect for any occasion.
Ingredients
- 3 cups all-purpose flour
- 1 ½ teaspoons salt
- 1 teaspoon instant yeast
- 1 ½ cups warm water
Instructions
- Mix dry ingredients: In a large bowl, whisk together the flour, salt, and yeast until evenly combined.
- Combine with warm water: Gradually add warm water to the dry ingredients and stir until a sticky dough forms.
- Rest for flavor: Cover tightly and let sit at room temperature for 12-18 hours.
- Shape the dough: Turn dough out onto a floured surface and shape it into a ball without overworking it.
- Second rise: Allow the dough to rise uncovered for about one hour.
- Preheat the oven: Preheat your oven to 450°F (230°C) with a Dutch oven inside.
- Transfer the dough: Place the shaped dough inside the hot Dutch oven and cover with a lid.
- Bake covered: Bake for 30 minutes covered.
- Finish baking: Remove the lid and continue baking for an additional 15-20 minutes.
- Cool and slice: Let the bread cool on a wire rack for at least 30 minutes before slicing.
Notes
You can prepare the dough the night before and bake it fresh in the morning. The Dutch oven method creates a beautiful crust, but other methods can be used as well.
- Prep Time: 15 minutes
- Cook Time: 45 minutes
- Category: Bread
- Method: Baking
- Cuisine: American
Nutrition
- Serving Size: 1 slice
- Calories: 120
- Sugar: 0g
- Sodium: 400mg
- Fat: 0.5g
- Saturated Fat: 0g
- Unsaturated Fat: 0g
- Trans Fat: 0g
- Carbohydrates: 24g
- Fiber: 1g
- Protein: 2g
- Cholesterol: 0mg
Keywords: no-knead bread, homemade bread, sandwich bread, easy bread recipe, baking bread