

No Bake Turtle Dream Bars
Introduction to No Bake Turtle Dream Bars
As a busy mom, I know how precious time can be, especially when it comes to whipping up something sweet. That’s why I absolutely adore these No Bake Turtle Dream Bars! They’re a delightful blend of chocolate, caramel, and pecans, all without the fuss of baking. Imagine serving a dessert that not only looks impressive but also takes just 20 minutes to prepare! Whether you’re hosting a gathering or just treating your family, these bars are the perfect solution for a quick, delicious treat that everyone will love.
Why You’ll Love This No Bake Turtle Dream Bars
These No Bake Turtle Dream Bars are a lifesaver for busy days! They come together in a flash, making them perfect for last-minute gatherings or a sweet craving. The combination of rich chocolate, gooey caramel, and crunchy pecans creates a flavor explosion that’s hard to resist. Plus, there’s no oven required, so you can keep your kitchen cool while still impressing your loved ones with a decadent dessert!
Ingredients for No Bake Turtle Dream Bars
Gathering the right ingredients is the first step to creating these delightful No Bake Turtle Dream Bars. Here’s what you’ll need:
- Graham cracker crumbs: These form the base of your bars, providing a sweet and crunchy texture.
- Unsweetened cocoa powder: This adds a rich chocolate flavor, balancing the sweetness of the other ingredients.
- Powdered sugar: A must for sweetness, it helps create a smooth texture in the crust.
- Unsalted butter: Melted butter binds the crust together and adds a lovely richness.
- Sweetened condensed milk: This creamy ingredient is the secret to a luscious chocolate layer that’s simply irresistible.
- Chocolate chips: Use semi-sweet or dark chocolate chips for a decadent layer that melts beautifully.
- Caramel sauce: Drizzling this over the chocolate layer adds a gooey sweetness that’s hard to resist.
- Chopped pecans: These provide a delightful crunch and nutty flavor, complementing the chocolate and caramel perfectly.
For those who might want to switch things up, feel free to substitute walnuts for pecans or use dark chocolate chips for a richer taste. You can find all the exact measurements at the bottom of the article, ready for printing!
How to Make No Bake Turtle Dream Bars
Now that you have all your ingredients ready, let’s dive into the fun part—making these No Bake Turtle Dream Bars! Follow these simple steps, and you’ll have a delicious dessert in no time.
Step 1: Prepare the Crust
Start by grabbing a mixing bowl. Combine the graham cracker crumbs, cocoa powder, powdered sugar, and melted butter. Mix everything together until it’s well combined. You want a crumbly yet cohesive texture. It should hold together when pressed. This crust is the foundation of your bars, so make sure it’s just right!
Step 2: Form the Base
Next, take your mixture and press it firmly into the bottom of a greased 9×9 inch baking dish. Use your fingers or the back of a measuring cup to create an even layer. This crust will be the perfect base for your chocolate and caramel layers, so make sure it’s packed down well. A solid base means a sturdy bar!
Step 3: Make the Chocolate Layer
In a saucepan, combine the sweetened condensed milk and chocolate chips. Heat this mixture over low heat, stirring constantly until it’s melted and smooth. This step is crucial for achieving that rich, creamy chocolate layer. The aroma will be heavenly, and you might be tempted to taste it—go ahead, I won’t tell!
Step 4: Assemble the Bars
Once your chocolate mixture is ready, pour it over the crust. Use a spatula to spread it evenly across the surface. This layer is where the magic happens! The chocolate will meld beautifully with the crust, creating a decadent treat that’s hard to resist.
Step 5: Add Caramel and Pecans
Now it’s time to drizzle that luscious caramel sauce over the chocolate layer. Be generous! Then, sprinkle the chopped pecans on top. This adds a delightful crunch and nutty flavor that perfectly complements the sweetness of the caramel and chocolate. It’s like a party for your taste buds!
Step 6: Chill and Serve
Finally, pop the dish into the refrigerator for at least 2 hours. This allows the bars to set properly. Once they’re firm, cut them into squares and serve chilled. Trust me, these No Bake Turtle Dream Bars will be the star of any gathering!
Tips for Success
- Make sure to press the crust firmly for a sturdy base.
- Use high-quality chocolate chips for the best flavor.
- Let the bars chill longer if they’re not set after 2 hours.
- For easier cutting, use a sharp knife and wipe it clean between cuts.
- Store leftovers in an airtight container to keep them fresh.
Equipment Needed
- Mixing bowl: A medium-sized bowl works best, but any bowl will do.
- 9×9 inch baking dish: If you don’t have one, an 8×8 inch dish is a good alternative.
- Spatula: A rubber spatula is great for spreading, but a spoon will work too.
- Saucepan: Use a small saucepan for melting the chocolate and milk.
- Measuring cups: Essential for accurate ingredient measurements.
Variations of No Bake Turtle Dream Bars
- Nut-Free: Omit the pecans and replace them with sunflower seeds for a nut-free option.
- Gluten-Free: Use gluten-free graham cracker crumbs to make these bars suitable for gluten-sensitive diets.
- Vegan: Substitute the butter with coconut oil and use dairy-free chocolate chips and caramel sauce.
- Flavor Twist: Add a pinch of sea salt on top for a salted caramel version that enhances the flavors.
- Fruit Addition: Mix in some chopped dried fruits like cherries or cranberries for a fruity surprise.
Serving Suggestions for No Bake Turtle Dream Bars
- Pair these bars with a scoop of vanilla ice cream for a delightful contrast.
- Serve alongside a hot cup of coffee or a chilled glass of milk.
- For a festive touch, garnish with whipped cream and a drizzle of extra caramel.
- Present them on a colorful platter for an eye-catching dessert display.
FAQs about No Bake Turtle Dream Bars
As you embark on your journey to make these delightful No Bake Turtle Dream Bars, you might have a few questions. Here are some common queries that I’ve encountered, along with helpful answers!
Can I make No Bake Turtle Dream Bars ahead of time?
Absolutely! These bars are perfect for making ahead. Just prepare them, chill, and store them in the refrigerator. They’ll stay fresh for up to a week, making them a great option for meal prep or gatherings.
What can I use instead of pecans?
If you’re not a fan of pecans, walnuts are a fantastic substitute. You can also skip the nuts entirely for a nut-free version, or use seeds like sunflower seeds for added crunch.
How do I store leftovers?
Store any leftover No Bake Turtle Dream Bars in an airtight container in the refrigerator. This keeps them fresh and ready for your next sweet craving!
Can I freeze these bars?
Yes, you can freeze them! Just wrap the bars tightly in plastic wrap and place them in a freezer-safe container. They’ll last for about 2 months. Thaw them in the fridge before serving.
What’s the best way to cut these bars?
For clean cuts, use a sharp knife and wipe it clean between cuts. This helps maintain the beautiful layers and makes for a more appealing presentation!
Final Thoughts
Making No Bake Turtle Dream Bars is more than just a cooking task; it’s a delightful experience that brings joy to both the cook and those who indulge in them. The combination of chocolate, caramel, and pecans creates a symphony of flavors that can brighten any day. Whether you’re sharing them with family or enjoying a quiet moment with a cup of coffee, these bars are sure to bring smiles. Plus, the ease of preparation means you can whip them up anytime, making them a go-to treat for busy moms like me. Enjoy every delicious bite!
Print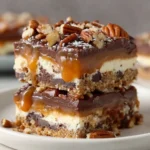
No Bake Turtle Dream Bars: A Sweet Treat You’ll Love!
- Total Time: 2 hours 20 minutes
- Yield: 16 bars 1x
- Diet: Vegetarian
Description
No Bake Turtle Dream Bars are a delicious and easy dessert that combines the flavors of chocolate, caramel, and pecans without the need for baking.
Ingredients
- 1 cup graham cracker crumbs
- 1/2 cup unsweetened cocoa powder
- 1/2 cup powdered sugar
- 1/2 cup unsalted butter, melted
- 1 cup sweetened condensed milk
- 1 cup chocolate chips
- 1 cup caramel sauce
- 1 cup chopped pecans
Instructions
- In a mixing bowl, combine graham cracker crumbs, cocoa powder, powdered sugar, and melted butter until well mixed.
- Press the mixture into the bottom of a greased 9×9 inch baking dish to form the crust.
- In a saucepan, heat the sweetened condensed milk and chocolate chips over low heat until melted and smooth.
- Pour the chocolate mixture over the crust and spread evenly.
- Drizzle caramel sauce over the chocolate layer and sprinkle with chopped pecans.
- Refrigerate for at least 2 hours until set.
- Cut into bars and serve chilled.
Notes
- For a richer flavor, use dark chocolate chips.
- Store leftovers in an airtight container in the refrigerator.
- Feel free to substitute walnuts for pecans if desired.
- Prep Time: 20 minutes
- Cook Time: 0 minutes
- Category: Dessert
- Method: No Bake
- Cuisine: American
Nutrition
- Serving Size: 1 bar
- Calories: 250
- Sugar: 20g
- Sodium: 150mg
- Fat: 12g
- Saturated Fat: 7g
- Unsaturated Fat: 3g
- Trans Fat: 0g
- Carbohydrates: 30g
- Fiber: 1g
- Protein: 3g
- Cholesterol: 20mg
Keywords: No Bake Turtle Dream Bars, dessert, chocolate, caramel, pecans