

Old-Fashioned Pink Jelly Cakes
Old-fashioned desserts have a way of tugging at the heartstrings, don’t they? Imagine the warmth of a cozy kitchen filled with the sweet, fruity aroma of freshly baked cakes mingling with the comforting scent of coconut. Picture the delight of biting into a fluffy cake, its delicate texture giving way to a burst of strawberry-flavored jelly, all lovingly enveloped in a velvety layer of whipped cream. As you indulge in an Old-Fashioned Pink Jelly Cake, nostalgia wraps around you like a favorite throw blanket, evoking memories of laughter and joy around family gatherings.
Typically adorned with its charming pink hue, this delightful dessert stands as a testament to simpler times, where treats were crafted with care and shared among loved ones. Each bite reveals a playfulness between sweet and creamy, soft and crunchy, as the flavor of strawberry dances on your palate, leaving you craving just one more taste. These cakes do more than satisfy a sweet tooth; they bring people together, sparking conversations and creating new memories over the delightful treat.
Why You’ll Love This Old-Fashioned Pink Jelly Cakes
There’s an undeniable allure to Old-Fashioned Pink Jelly Cakes that addresses your sweet cravings on multiple levels. For starters, the flavor combination – a sweet, soft sponge infused with the refreshing tang of strawberry jelly – creates a truly enchanting experience. The delicate sponge cake melts in your mouth, while the jelly filling adds a juicy burst that keeps you reaching for more. Each cake is wrapped in a shower of desiccated coconut, providing a crisp texture that perfectly contrasts with the softness of the cake and the creaminess of the whipped topping.
These cakes shine brightest at celebrations and gatherings. Whether you’re hosting a tea party, celebrating a birthday, or simply enjoying the company of friends on a sunny afternoon, the presence of Old-Fashioned Pink Jelly Cakes brings an instant smile to faces. Additionally, they work wonderfully as a fun homemade treat for children’s school lunches, proving that nostalgia can be delicious and portable!
Preparation Phase & Tools to Use
Every masterpiece in the kitchen begins with the right tools, and crafting Old-Fashioned Pink Jelly Cakes is no exception. Here’s what you need to bring this delightful recipe to life:
- Patty-pan tins: Essential for achieving that perfect cake shape. The 12-hole variety ensures even baking and allows for easy handling.
- Mixing bowls: A good set will help you efficiently combine your ingredients, from the creaming of butter and sugar to merging your liquids and dry components.
- Electric mixer: While you can mix by hand, an electric mixer makes the creaming process a breeze, incorporating air into the batter for a lighter texture.
- Spatula: This handy tool helps fold in ingredients gently, ensuring your cake remains fluffy without losing air.
- Cooling rack: Once your cakes are baked to perfection, allow them to cool evenly to maintain their structure and prevent sogginess.
Preparation becomes seamless when you gather your tools beforehand. Take a moment to clear your workspace, preheat your oven, and measure out your ingredients to ensure a delightful baking experience that feels gratifying rather than rushed.
Ingredients for Old-Fashioned Pink Jelly Cakes
For successful jelly cakes, having the right ingredients matters, and here’s what you’ll need:
- 80g Butter, softened: This is your foundation for richness, creating a base that’s smooth and flavorful.
- 1/2 cup (110g) caster sugar: The fine texture of caster sugar dissolves quickly, ensuring a sweet, tender crumb.
- 1 tsp vanilla extract: A splash of vanilla works wonders, enhancing the flavors and adding warmth.
- 1 Egg: This binds and provides moisture, contributing to your cake’s delightful softness.
- 2/3 cup (160g) milk: Milk hydrates the batter and helps create that luscious, moist texture we all crave.
- 1 cup (130g) self-raising flour, sifted: This crucial ingredient ensures your cakes rise beautifully, leading to that light and airy texture.
- 85g packet strawberry jelly crystals: The star of the show, these crystals provide flavor and color, transforming the cake into something spectacular.
- 1 cup (240g) boiling water: It dissolves the jelly crystals, activating their sweet goodness.
- 1 cup (240g) cold water: Helps achieve the right jelly consistency.
- 3 1/2 cups (280g) desiccated coconut: This adds a delightful crunch and elevates your jelly cakes with its tropical essence.
- 1 cup (240g) whipped cream: Whipped cream brings an indulgent creaminess that balances the sweetness of the jelly.
Feel free to get creative! Substitute unsalted butter with margarine for a dairy-free option, or explore gel flavors beyond strawberry to suit your taste. The beauty of jelly cakes lies in their versatility!
How to Make Old-Fashioned Pink Jelly Cakes
Now that you have your tools and ingredients, it’s time to create these delightful cakes. Let’s dive into the step-by-step process:
-
Preheat your oven to 175°C (fan-forced) and lightly grease two 12-hole patty-pan tins to prevent sticking.
-
In a large bowl, cream the softened butter, caster sugar, and vanilla using an electric mixer until pale and fluffy. This could take about 4-5 minutes, so be patient! You want to incorporate lots of air for that dreamy texture.
-
Beat in the egg until fully incorporated, ensuring the mixture remains fluffy.
-
Gradually fold in the milk and sifted flour alternatively, starting and ending with flour. Do this in two batches to prevent over-mixing, which could make your cakes dense.
-
Spoon the batter into the patty-pan holes, filling each just below the top—about three-quarters full works well.
-
Bake for 15-18 minutes, or until lightly golden. A skewer inserted should come out clean. The aroma wafting through your kitchen will invite anyone nearby to take a peek!
-
Allow them to cool in the tins for 5 minutes before transferring to a wire rack. Let them cool completely before proceeding.
-
Meanwhile, prepare the jelly. Dissolve the jelly crystals in boiling water, stirring until fully dissolved. Then add cold water and refrigerate until partially set, roughly 1-2 hours.
-
Dip each cooled cake into the jelly with a slotted spoon, letting excess drip off. Roll them in desiccated coconut, ensuring a lovely coating for that nostalgic look!
-
Spoon a generous dollop of whipped cream onto the flat side of one cake, then sandwich it with another cake, creating delightful, creamy layers.
-
Chill in the fridge for 30 minutes to let those flavors meld and the jelly set before serving.
Chef’s Notes & Helpful Tips
To get the most out of your jelly cakes:
-
Make-ahead tips: Feel free to bake the cakes a day in advance! Store them in an airtight container at room temperature without the jelly and coconut coating. Once ready to serve, simply finish assembling them.
-
Cooking alternatives: If you prefer an air fryer, you can reduce the temperature slightly and bake for about 10-12 minutes, keeping an eye on doneness.
-
Customization ideas: Switch up the flavor profile by experimenting with different jelly flavors like raspberry, blue raspberry, or even pineapple! A hint of lemon zest can add an exciting touch to the sponge.
Common Mistakes to Avoid
Every kitchen adventure has its pitfalls. Here’s how to keep your baking flawless:
- Overmixing the batter: This leads to dense cakes. Be gentle when folding in your flour and milk mixture.
- Too hot or too cold oven: Always preheat your oven. An oven thermometer can help maintain an accurate temperature, ensuring even baking.
- Jelly set too hard: Take care not to let the jelly fully set before dipping; it should be partially set for that perfect adherence to the cake.
- Not cooling cakes fully: If you frost or dip your cakes while they’re still warm, the jelly will slide off like an avalanche—thankfully, a simple cooling step prevents this.
What to Serve With Old-Fashioned Pink Jelly Cakes
Enhance your dessert experience with these delightful pairings that complement the charm of jelly cakes:
- Fresh fruit salad: The refreshing burst of seasonal fruits complements the sweetness beautifully.
- A dollop of clotted cream: Its rich creaminess elevates the indulgence factor and pairs sweetly with the cakes.
- Herbal tea: A light Earl Grey or refreshing mint tea brings warmth and balance to the sweetness.
- Coffee: Brew a pot of your favorite blend to create a comforting moment that echoes home.
- Ice cream: Try vanilla or strawberry to make it a decadent dessert.
- Chocolate sauce: A drizzle of chocolate adds depth and a hint of bitterness to contrast the sweetness.
- Syrup: A touch of strawberry syrup can enhance the jelly flavor and add an extra splash of color.
- Cheese platter: A sharp cheddar or creamy brie can act as a savory contrast to the sweetness of the cakes.
Storage & Reheating Instructions
These delightful cakes can be enjoyed beyond the first day! Here’s how to keep them fresh:
- Fridge: Store any leftovers in an airtight container for up to 3 days. The jelly may soften, but they’ll still be delicious.
- Freezer: Freeze the cakes without toppings. Just wrap them tightly in plastic wrap, then foil, to avoid freezer burn. They’ll keep well for up to 3 months.
- Reheating: Transition from freezer to fridge overnight if you want to thaw, or let them sit at room temperature for a bit before serving straight out of the fridge.
Estimated Nutrition Information
Each Old-Fashioned Pink Jelly Cake contains approximately:
- Calories: 170
- Protein: 2g
- Carbohydrates: 27g
- Fat: 7g
- Fiber: 1g
- Sugar: 11g
(Note: These values are estimates and can vary based on ingredients and portion sizes.)
FAQs
-
Can I use fresh fruit instead of jelly?
Certainly! Fresh fruit like chopped strawberries or raspberries can serve as a delightful filling. However, you’ll need to adjust sweetness accordingly. -
How can I make these gluten-free?
Substitute self-raising flour with a gluten-free self-raising flour blend. Ensure your other ingredients, like the jelly crystals, are gluten-free. -
What if I don’t have desiccated coconut?
Shredded coconut may work in a pinch. You might want to dry it a little more before using for the best texture. -
Can I reduce sugar in the recipe?
You can cut back on sugar, though this may influence the structure and moisture of the cake. It might require testing to find just the right balance. -
How long do these cakes keep in the freezer?
They can maintain quality for about 3 months when properly wrapped. Just remember to thaw them slowly in the fridge when you’re ready to serve.
Conclusion
Creating Old-Fashioned Pink Jelly Cakes is not just about baking; it’s about crafting sweet memories and indulging in joyful flavors. Each cake offers a delightful escape into a world of nostalgia, where family and friendship intertwine with laughter and love. As you embark on this delectable endeavor, let your creativity flourish, and don’t hesitate to invite loved ones into your kitchen to share the experience. After all, the joy of baking is infinitely sweeter when it’s shared. So gather your ingredients, embrace the warm memories, and bite into these luscious little cakes that are sure to bring delight to all who taste them!
Print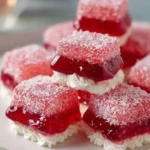
Old-Fashioned Pink Jelly Cake
- Total Time: 1 hour
- Yield: 12 servings 1x
- Diet: Vegetarian
Description
A nostalgic dessert featuring soft sponge cake filled with strawberry jelly and coated in coconut, perfect for gatherings.
Ingredients
- 80g Butter, softened
- 1/2 cup (110g) caster sugar
- 1 tsp vanilla extract
- 1 Egg
- 2/3 cup (160g) milk
- 1 cup (130g) self-raising flour, sifted
- 85g packet strawberry jelly crystals
- 1 cup (240g) boiling water
- 1 cup (240g) cold water
- 3 1/2 cups (280g) desiccated coconut
- 1 cup (240g) whipped cream
Instructions
- Preheat your oven to 175°C (fan-forced) and lightly grease two 12-hole patty-pan tins.
- In a large bowl, cream the softened butter, caster sugar, and vanilla using an electric mixer until pale and fluffy, about 4-5 minutes.
- Beat in the egg until fully incorporated.
- Gradually fold in the milk and sifted flour alternatively, starting and ending with flour.
- Spoon the batter into the patty-pan holes, filling each about three-quarters full.
- Bake for 15-18 minutes, or until lightly golden and a skewer comes out clean.
- Allow cooling in the tins for 5 minutes before transferring to a wire rack to cool completely.
- Meanwhile, dissolve the jelly crystals in boiling water, then add cold water and refrigerate until partially set, about 1-2 hours.
- Dip each cooled cake into the jelly, roll in desiccated coconut.
- Spoon whipped cream onto one cake, sandwich with another, and chill for 30 minutes before serving.
Notes
Make-ahead tips: Bake the cakes a day in advance and assemble when ready to serve. Avoid overmixing for a fluffier cake.
- Prep Time: 20 minutes
- Cook Time: 18 minutes
- Category: Dessert
- Method: Baking
- Cuisine: American
Nutrition
- Serving Size: 1 cake
- Calories: 170
- Sugar: 11g
- Sodium: 200mg
- Fat: 7g
- Saturated Fat: 5g
- Unsaturated Fat: 2g
- Trans Fat: 0g
- Carbohydrates: 27g
- Fiber: 1g
- Protein: 2g
- Cholesterol: 30mg
Keywords: cake, dessert, strawberry, nostalgic, jelly