
Dive into a Creative Craft: How to Make Your Own Jellyfish Lanterns
Dive into a Creative Craft: How to Make Your Own Jellyfish Lanterns
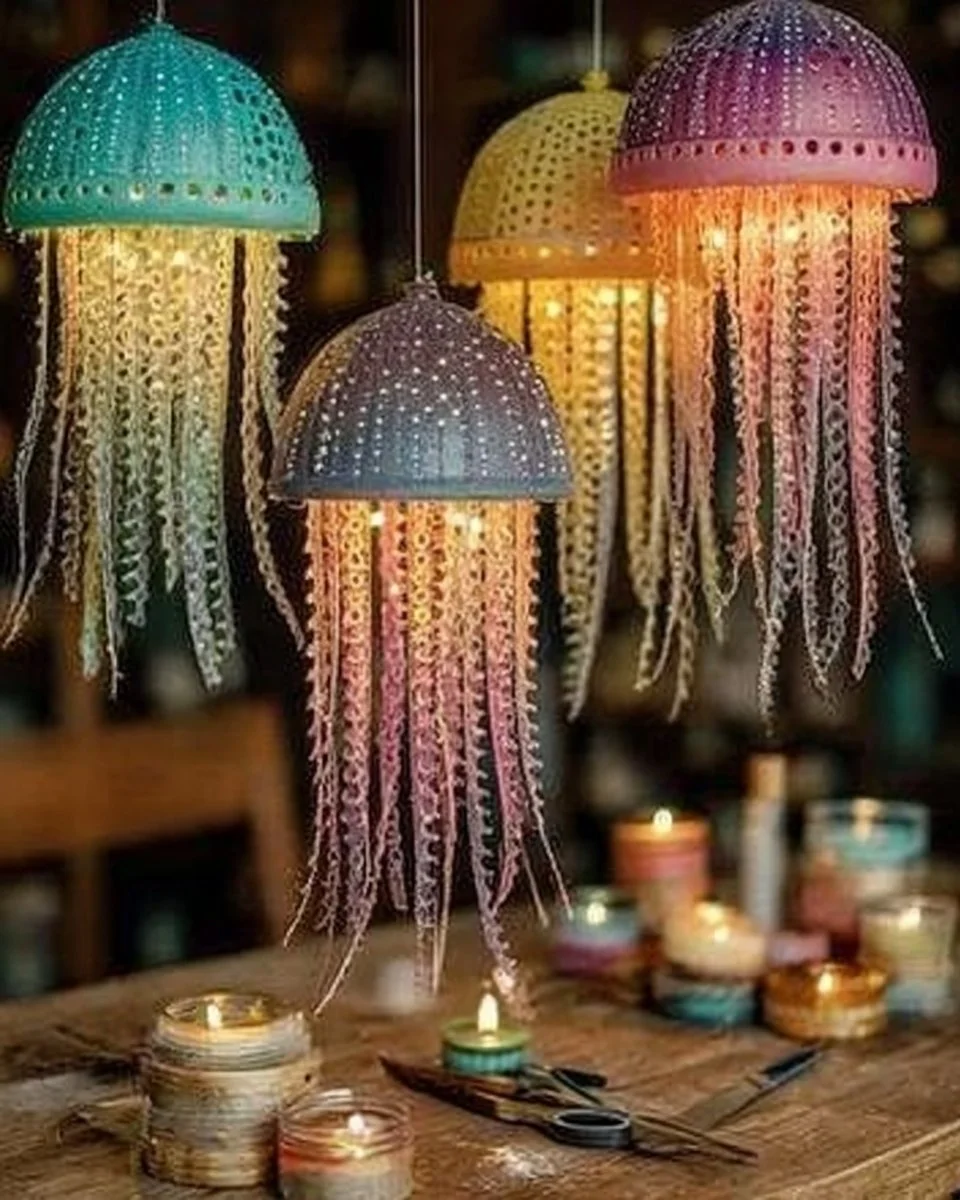
Imagine a warm summer evening, the air fragrant with blooming jasmine. You gather with friends in a cozy backyard, laughter mingling with the soft sound of crickets chirping as dusk settles over the horizon. Suddenly, a whimsical glow catches your eye—a series of enchanting jellyfish lanterns gently swaying in the evening breeze, illuminating the space with a soft, pastel light. It’s a magical atmosphere, and you realize that these delightful creations are the result of your own creativity in action.
Are you ready to conjure the same spark of wonder in your space? Today, let’s embark on a DIY adventure to create beautiful jellyfish lanterns that will not only brighten your evenings but also become a cherished part of your decor.
The Allure of Jellyfish Lanterns
What is it about jellyfish lanterns that captivates us? Perhaps it’s the sense of whimsy they bring or the tactile satisfaction of creating something uniquely your own. These luminous creations can transform mundane spaces into beautifully lit wonderlands, drawing the admiration of family and friends alike.
People love the charm of jellyfish lanterns for various occasions. They work beautifully for summer nights, adding a splash of color to patio parties, or even as a serene nightlight for children’s rooms, evoking the enchanting underwater world. The process of making them is just as rewarding as the final product; you can unleash your creativity while crafting, allowing your imagination to flow freely through vibrant colors and delightful textures.
Materials to Gather
Before we dive into the step-by-step process, let’s gather our materials. This project does not require an extensive supply list, making it accessible for beginners and experienced crafters alike. Here’s what you need:
- Plastic Colanders: The sturdy structure will serve as the base of your lanterns, creating that fun jellyfish shape.
- Acrylic Paint: Pastel colors are perfect for a dreamy, underwater feel.
- Paintbrush: For applying that lovely coat of paint.
- Ribbon or Tulle Strips: These will become the flowing tentacles of your jellyfish.
- Bead Garlands: A splash of sparkle and texture for added visual interest.
- Hot Glue Gun: Essential for attaching all those beautiful components together.
- Scissors: For cutting ribbons and tulle to the perfect lengths.
- String Lights: To create that enchanting glow from within.
- Ribbon for Hanging: So you can elegantly display your creations.
Crafting Your Jellyfish Lanterns
Let’s unlock the whimsical world of crafting! Follow these steps as you create your stunning jellyfish lanterns:
Paint the Colanders
Start by applying a generous coat of acrylic paint to your plastic colanders. Pastel colors like soft pinks, blues, and greens evoke a sense of tranquility and whimsy that suit these oceanic delights perfectly. Lay them out on a tarp or newspaper to protect your surfaces, and allow them to dry completely before moving on. Picture the colors blending together as if you were capturing a sunrise beneath the sea—a gently swirling serenity guiding you.
Create the Jellyfish Shape
Once the colanders are dry, flip them upside down. Voilà! You now have the dome of your jellyfish, ready to be adorned. At this moment, you might even imagine catching glimpses of the ocean waves reflected in the colors you chose.
Prepare the Tentacles
Take your ribbons and tulle, and cut them into long strips. Varying lengths will create a more dynamic, flowing effect, mimicking the gentle movement of jellyfish tentacles in water. As you snip through the fabric, let your choices be guided by the rhythm of your imagination.
Attach the Tentacles
Using your hot glue gun, adhere the ribbons and tulle strips around the inner edge of the upside-down colander. You can layer them and even mix different textures for a delightful look. If you’re feeling extra creative, intersperse some bead garlands among the tentacles for an added touch of sparkle, much like the light of the sun dancing on the surface of the sea.
Add the Glow
The true magic happens when you place string lights inside the colander. Let the soft glow peek through those colorful designs, illuminating your creation and casting gentle shadows. It’s akin to a hidden treasure waiting to be unveiled, turning your backyard or living room into a luminous spectacle.
Hang and Display
Finally, affix a sturdy ribbon to the top of the colander for easy hanging. It’s time to choose the perfect spot—indoors for a cozy ambiance or outdoors to enchant your guests under the stars. Visualize your lanterns swaying lightly in the breeze, creating a dance of shadows and colors that ensnares the heart.
Tips for Enhancing Your Jellyfish Lanterns
As with any craft project, little tweaks can elevate your creations. Here are some thoughtful tips:
- Use Battery-Powered Lights: Safety first! If you plan to hang these lanterns outdoors, opt for battery-powered string lights to avoid any electrical hazards.
- Experiment with Ribbon Textures: Mixing satin with burlap or organza can create an alluring visual texture that mimics the fluidity of underwater life.
- Varying Heights: For an enchanting installation, hang your jellyfish lanterns at different heights. This adds depth and intrigue to your space, reminiscent of a school of jellyfish floating gracefully.
Mistakes to Avoid
Even the most seasoned crafters can make some common mistakes. Here’s what to keep in mind:
- Rushing the Paint Drying Process: Ensure the paint is completely dry before attaching any materials. Premature handling can lead to smudging or peeling.
- Overusing Hot Glue: While it may be tempting to slather glue everywhere, using too much can create unsightly drips. A careful application will keep your lanterns looking polished.
Creative Variations
If you’re itching to put a personal stamp on your jellyfish lanterns, consider these fun variations:
- Glow-in-the-Dark Paint: Add a twist by using glow-in-the-dark paint on your colanders for lanterns that shine bright even in complete darkness.
- Theme-Specific Colors: Tailor your jellyfish to match the theme of any party or holiday—think oranges and blacks for Halloween, or jewel tones for a festive winter gathering.
Displaying Your Lanterns
Once you’ve created your enchanting jellyfish lanterns, think about the best way to present them. Drape them among trees, hang them from a gazebo, or use them as centerpieces on tables. Their gently rotating forms and soft colors will create a tranquil atmosphere that invites conversation and wonder.
Frequently Asked Questions
Can I leave these lanterns outdoors?
Yes, but it’s best to bring them inside during harsh weather conditions.
How long will the string lights last?
Typically, battery-powered lights can last anywhere from 20 to 40 hours, depending on the quality and usage.
Conclusion: Bringing Joy to Your Space
As you step back and admire your jellyfish lanterns gently illuminating the space around you, it’s hard not to feel a sense of joy and accomplishment. This simple DIY project is more than just a craft; it’s a celebration of creativity, a testament to your ability to turn ordinary materials into something magical.
So why not gather your loved ones and invite them into your crafting journey? Share your enchanting jellyfish lanterns with those around you, brightening their lives just as they brighten yours. With each lantern glowing, you’ll find a world of wonder and warmth—your very own ocean of light to enjoy together.
Meta Description: Discover how to create enchanting DIY jellyfish lanterns that add whimsy and light to any occasion. Follow our step-by-step guide and bring magical creativity to your home!
SEO Tags: DIY Lanterns, Jellyfish Craft, Home Decor Ideas, Summer Crafts, Creative Living, Garden Decorations, DIY Projects