
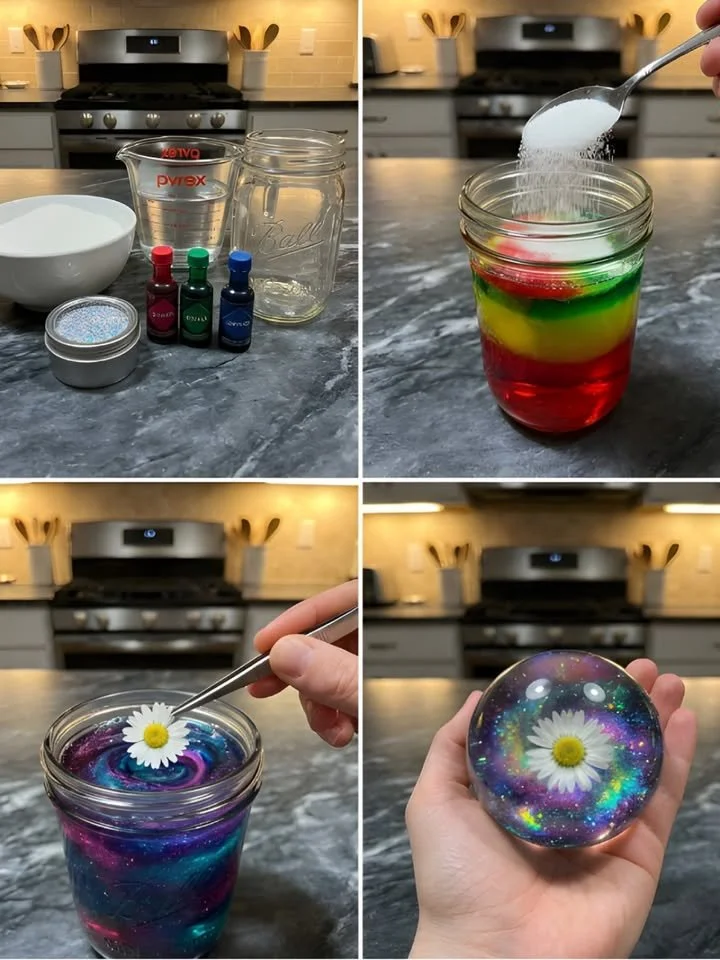
Kids think this is MAGIC… ✨
Kids Think This is MAGIC… ✨
One sunny afternoon, the scent of freshly baked cookies wafting through the kitchen, laughter resonates as you find yourself in the middle of another family crafting day. With the kids excitedly chattering about their grand plans, curiosity and energy fill the air. You realize it’s the perfect moment to introduce them to something that’s less of a chore and more of an adventure—a magical, colorful project that promises to captivate their imaginations and create something beautiful. Yes, I’m talking about the delightful art of making sugar crystals!
You might be wondering what makes this simple crafting activity feel like a sprinkle of magic. Well, it’s the way kids’ eyes light up with wonder as they witness the transformation of basic ingredients into something that mimics the beauty of nature. This activity feels a little like science, a little like art, and a whole lot like fun.
Why People Love This Idea
Imagine the glow of curiosity in your kids’ eyes as they mix and swirl vibrant colors, eager to see what happens next. It’s this sense of surprise and discovery that makes this project a hit in households everywhere. Children often see magic in the mundane, but when we elevate ordinary sugar and water into something visually enchanting, we encourage their sweet sense of wonder.
This project not only engages children creatively but teaches them patience and the overlooked art of anticipation—watching their sugary concoction transform into delicate crystals over time. Parents love it too, not only for the wholesome family time but also because it can spark conversations about science and art in ways that are playful and not at all intimidating.
Benefits and Best Occasions to Use It
This captivating activity serves multiple purposes. It’s a fantastic rainy-day project, a charming centerpiece for birthday parties, or an engaging classroom experiment. It’s versatile enough for different occasions—whether you’re home for the holidays, celebrating a child’s birthday, or simply enjoying a creative afternoon after school.
The benefits are endless. Here are some perks of diving into this magical craft:
- Enhances Creativity: Kids can experiment with color combinations and designs, allowing their imaginations to soar.
- Teaches Patience: Watching their creations grow over time helps instill patience and an understanding of processes.
- Family Bonding: This project invites everyone to get their hands a little sticky while enjoying laughter and shared satisfaction.
- Scientific Inquiry: It introduces children to basic chemistry in an enjoyable, practical way.
Materials You’ll Need
You probably have many of these ingredients tucked away in your kitchen. Let’s gather everything you need for this little adventure:
- Sugar: The star of this sweet show! Granulated sugar works best.
- Water: Just enough to hydrate our ingredients and create our colorful concoction.
- Food Coloring: A few drops can transform our mixture into a vibrant landscape.
- Glitter (optional): For an extra sprinkle of magic and whimsy.
- Small glass jar: A transparent vessel so you can admire the beauty as it forms.
- Spoon: To mix everything together and create swirls of color.
Step-by-Step Instructions
Let’s embark on this colorful journey together! Here’s how you can create these mesmerizing sugar crystals:
-
Mix Water with Food Coloring: Begin by pouring a small amount of water into your glass jar. Add a few drops of food coloring and watch as the water transforms into a beautiful hue. This is your base!
-
Gradually Add Sugar: Now, start slowly adding sugar to the jar. As you add, stir gently with your spoon. The goal is to mix until the sugar dissolves while keeping enough to create a thick mixture. You’ll feel the mixture start to change consistency—pay attention, this is where the magic begins!
-
Create Magical Swirls: If you’re feeling adventurous, this is the moment to add a bit of flair! Swirl in different colors of food coloring, allowing them to intertwine beautifully. Think of a soft rainbow, each color merging to create something unique and visual.
-
Witness the Transformation: Now comes the most exciting part—let the jar sit undisturbed. Over time, you’ll begin to see the crystallization occur, creating visually stunning formations. The anticipation builds as you and your kids watch the crystalline structures unfold.
Helpful Tips
As with any crafting journey, a few tips can ensure a smoother ride:
- Patience is Key: The crystalline formations take a little time. Explain to your kids that good things come to those who wait, building anticipation.
- Monitor the Mixture: Keep an eye on the jar; sometimes, you may need to add a sprinkle more of sugar to maintain consistency.
- Be Creative: Encourage your kids to think outside the box with colors and maybe even combining different types of glitters!
Beginner Mistakes to Avoid
While this project is practically foolproof, there are a few common pitfalls you can sidestep:
- Too Much Water: Adding too much water can hinder crystallization. Start small and add more sugar!
- Not Enough Sugar: Ensure your mixture feels thick enough; this will aid in creating those stunning crystals.
- Impatience: Remind your little ones that great things often take a moment to develop. It’s the waiting that builds excitement!
Creative Variations
Once you’ve got the hang of the basic recipe, the possibilities expand infinitely! Here are a few ideas:
- Flavor Infusions: Consider adding extracts like vanilla or almond to create fragrant sugar crystals.
- Themed Colors: For holidays, why not use color themes? Red and green for Christmas, warm yellows and oranges for Halloween, or icy blues for winter!
- Layering Colors: Instead of swirling, layer colors in the jar for a gradient effect—visually stunning and different!
Presentation Ideas
The final touch is all about presentation. Once your crystals have formed, display them proudly!
- Mini Centerpieces: Arrange several jars of different colors on a table as charming centerpieces.
- Gift Ideas: Pretty jars can be sweet gifts for friends or family, perfect for holiday celebrations.
- Personalized Labels: Decorate the jars with labels that identify the colors used or a name for the “magic potion.”
Storage Tips
If you happen to have leftover crystals, store them in a cool, dry place in a sealed jar to protect their stunning appearance.
Frequently Asked Questions
Can we eat the sugar crystals?
While the sugar itself is harmless, the crystals primarily serve as a craft project rather than a culinary treat! Just make sure all materials are food-safe if they are to be tasted.
How long does it take for crystals to form?
Typically, you’ll start to see formations within a few hours, but the magic continues for days, with the best results often seen after 24 hours.
Can we use different types of sugar?
While granulated sugar is the best option, you can experiment with other types for fun visual effects. Just remember, they may behave differently during the crystallization process.
Conclusion
This whimsical activity invites creativity, a sprinkle of science, and a dose of family bonding, making it the perfect magical craft for any household. As you mix, swirl, and wait, take time to enjoy the process, and relish the moments of laughter and discovery with your kids. After all, it’s in these small, joy-filled moments that lasting memories are created. With a little bit of magic and a hint of color, you’ll have everyone in your family asking for another round of this delightful craft again and again.
Happy crafting! ✨
SEO Meta Description: Discover the magical world of DIY sugar crystals! Engage your kids with this captivating, colorful project that blends science and creativity. Perfect for family fun.
SEO Tags:
- DIY sugar crystals
- Kids crafts
- Family activities
- Easy science projects
- Colorful crafts
- Creative family time
- Sugar crystal experiment