
Get Creative This Weekend with Marbled Air Dry Clay Pots
Get Creative This Weekend with Marbled Air Dry Clay Pots: A Family Project to Cherish
Imagine a bright Saturday morning, sunlight streaming through your kitchen window, casting playful patterns across the countertop. The smell of fresh coffee lingers in the air, and laughter echoes in every corner as your family gathers around the table. Today is not just any ordinary day; it’s a crafting day filled with creative and colorful possibilities. Everyone dives into a world of imagination, and what could be better than creating beautiful marbled air dry clay pots together?
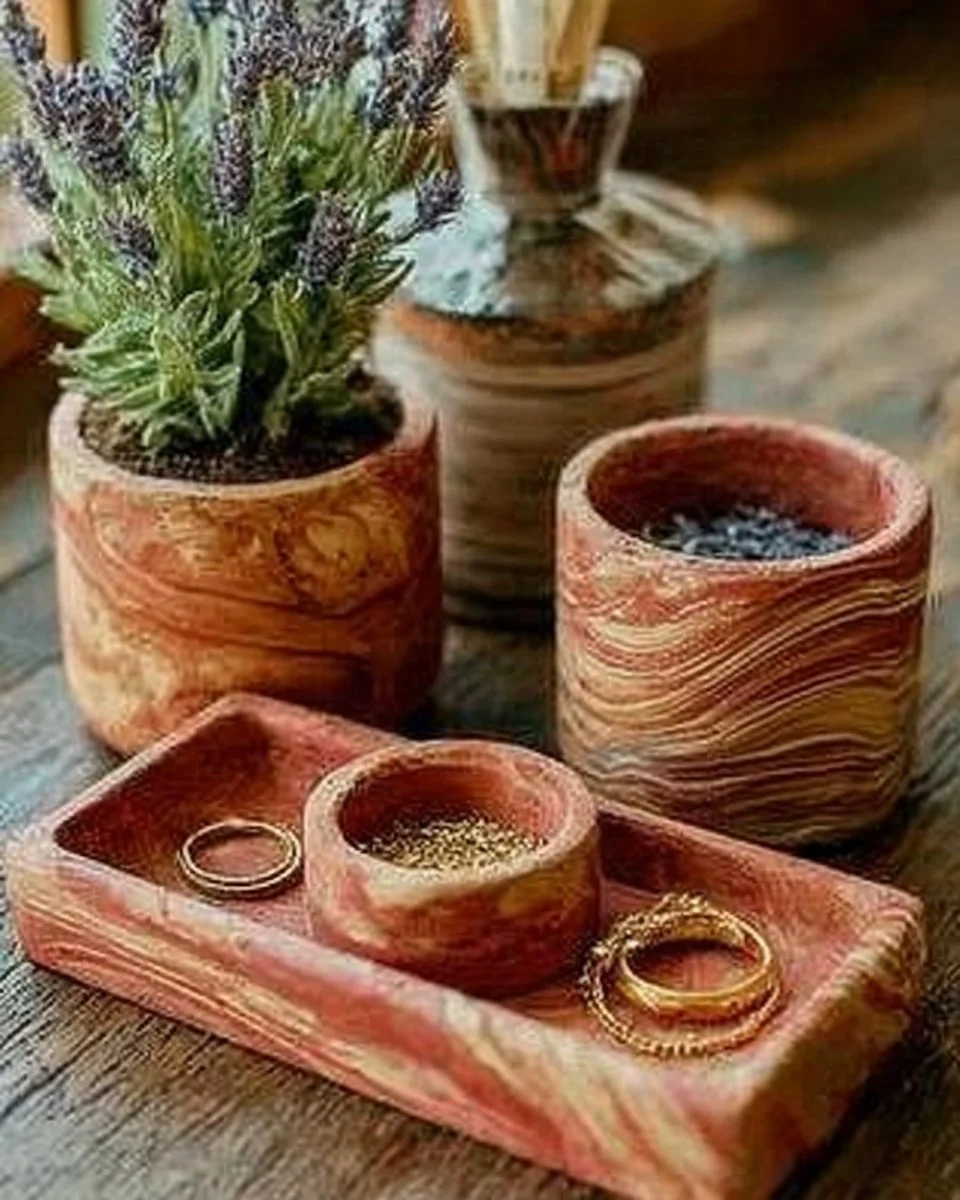
![Image of Marbled Air Dry Clay Pots]
Creating marbled air dry clay pots is a delightful project that engages the whole family, young and old alike. It’s not only fun to make but also a wonderful way to explore your artistic side, turning simple clay into unique pieces of art. Each pot becomes a canvas for creativity, inviting you to play with colors, patterns, and designs. Whether you want to fill them with vibrant plants or use them as charming decorative pieces around your home, marbled pots are sure to bring a touch of personality to your space.
Why People Love This Craft
Crafting with air dry clay has captured the hearts of many, and for good reason! This medium offers the perfect balance of flexibility and ease, making it suitable for crafters of all skill levels. The experience of sculpting and molding with your hands can be incredibly therapeutic, allowing you to express yourself creatively while also spending quality time with your loved ones.
Marbling techniques are especially beloved for their ability to create stunning effects. Each pot is a one-of-a-kind masterpiece, as the colors swirl and blend in ways that can’t be replicated, adding a personal touch to each creation. Beyond just aesthetics, making clay pots can also ignite discussions on art, colors, and nature. The project has a way of sparking joy and encouraging collaboration. Just imagine the delightful chaos of choosing colors, blending clay, and giggling as you create!
The Benefits of Marbled Air Dry Clay Pots
Crafting marbled air dry clay pots is not just about making something beautiful; it carries a plethora of benefits for families:
- Fosters Creativity: This project encourages individuals to express their personalities through colors and designs, creating an outlet for self-expression.
- Builds Fine Motor Skills: Molding and shaping the clay helps improve dexterity and hand-eye coordination in children and adults alike.
- Quality Time: Working together on a shared project strengthens bonds, making memories that last far beyond the weekend.
- Eco-Friendly Crafting: Air dry clay is non-toxic and can be a more sustainable option compared to other crafting materials.
- Endless Uses: Once created, these pots can be used for plants, candles, or as trinket holders—functionality meets artistry!
So, gather your family and friends because it’s time to roll up your sleeves and dive into this vibrant world of marbling and molding.
Materials You’ll Need
As you embark on this creative adventure, it’s essential to gather all your materials beforehand to ensure a fluid crafting experience. Here’s what you’ll need:
- Air Dry Clay: Choose a white or natural clay for a better marbling effect; you can find it at most craft stores.
- Acrylic Paint or Dyes: Select a range of colors that inspire you. Bright, bold colors can create striking effects!
- Rolling Pin: To flatten the clay smoothly.
- Cutting Tools: A craft knife or cookie cutters can help shape your pots.
- Water: For smoothing out the edges.
- Bowls or Molds: To shape your pots; you could also use smaller bowls to create unique pot forms.
- Paintbrushes: For applying colors and detailing.
Step-by-Step Instructions
- Prepare Your Workspace: Start by laying down a clean, flat surface covered with a plastic mat or old newspapers. This protects your table and makes clean-up a breeze. Gather all your materials so you can easily reach them while you craft.
- Condition the Clay: Before anything else, take your air dry clay and knead it well. This step is vital; it makes the clay more pliable and easy to work with. You’ll find it softens beautifully under your thumbs.
- Choose Your Colors: Pick your favorite acrylic paints. If you have family members working alongside you, let everyone choose a palette of two or three colors. The excitement builds as you start to visualize the final piece!
- Marble Your Clay: Take a small ball of clay and flatten it with the rolling pin until it’s about 1/4 inch thick. Add small dollops of your chosen paint colors on top, then use your fingers or a palette knife to swirl them together gently. Be careful not to mix too much; you want those beautiful, bold streaks for that marbled effect.
- Shape Your Pot: Once you’re happy with your marbling, it’s time to shape the pot. Roll the clay into a cylinder and gently press it against the formed mold or bowl. Smooth the top edge with a little water, ensuring it’s visually appealing and neat.
- Make the Drainage Hole: If you’re planning to use these pots for plants, be sure to poke a small drainage hole in the bottom. This prevents water from pooling and keeps your plants healthy!
- Dry and Decorate: Allow the pots to dry completely, which usually takes about 24 hours. Once they’re dry, feel free to paint additional designs or embellishments if you’re inspired!
Helpful Tips Throughout the Crafting Process
- Experiment Boldly: Don’t be afraid to mix and match colors. The beauty of marbled pots lies in the unpredictability of how the colors will come together.
- Drying Time: If you’re in a hurry, try placing your pots in a warm, dry area to speed up the drying process.
- Make a Mess: Expect a bit of cleanup! Crafting can get messy, but that’s part of the fun. Lay down newspapers or use aprons to protect your clothes and surfaces.
Beginner Mistakes to Avoid
- Overmixing Colors: Resist the temptation to blend every color together too much while marbling, as this can lead to mud-like tones instead of beautiful swirls.
- Sizing the Pot: Keep in mind the final use of your pot when sizing it. Measure if possible to create uniform pots for a cohesive look.
- Forgetting a Drainage Hole: If you’re using these for plants, skipping the drainage hole can ruin your efforts when it comes to plant care.
Creative Variations
Once you’ve mastered the basics, consider experimenting with different variations!
- Layering Colors: Instead of marbling, try layering colors for a striped effect!
- Texturing: Incorporate stamps or textured tools into your shaping routine to add depth and interest.
- Gold or Metallic Accents: After the pots are dry, use gold or silver paint for an elegant touch around the rim or in patterns to make your pots shine.
Presentation and Decoration Ideas
Once your marbled pots are done drying, it’s time to get creative again! Consider filling them with:
- Succulents or Cacti: Their bright colors will pop against the marbled background!
- Candles: Turn your pots into charming candleholders to create a cozy atmosphere.
- Herbs: Place them on your kitchen windowsill for easy access while cooking.
Maintenance Tips
Caring for your air dry clay pots is essential for preserving their beauty:
- Display Away from Water: If used for succulents, always place a waterproof tray underneath to catch drips.
- Dusting: Use a soft cloth to gently dust off your pots to keep them looking fresh.
- Repaint Where Needed: If colors begin to fade or scuff, don’t hesitate to give them a fresh coat!
Frequently Asked Questions
Can I use a regular oven with air dry clay?
No, regular air dry clay is designed specifically to cure at room temperature. Baking can lead to cracking.
How long does it take for the clay to fully dry?
Typically, air dry clay takes about 24 hours to fully dry, but larger pieces may take longer.
What should I do if my pot cracks?
You can often repair small cracks with a little extra water and some clay. Just smooth it out and let it dry again.
Conclusion: Unleash Your Family’s Creativity
This weekend, let the creativity flow as you gather your family around the table to craft marbled air dry clay pots. It’s more than just a fun project; it’s a chance to connect, collaborate, and celebrate your creative spirits. Together, you’ll forge lasting memories and beautiful decorations that will add warmth and personality to your home. So, roll up your sleeves, choose those vivid colors, and watch as you transform simple clay into stunning works of art. After all, it’s not just about what you create but the joy of creating together that makes every moment magical!
SEO Meta Description:
Transform your crafting weekend into an unforgettable experience with marbled air dry clay pots! This article covers materials, step-by-step instructions, and tips for making unique pots that the whole family will love to create.
Suggested SEO Tags:
- marbled air dry clay pots
- family crafting projects
- creative weekend ideas
- DIY clay crafts
- home decor ideas
- air dry clay techniques
- colorful pot designs