
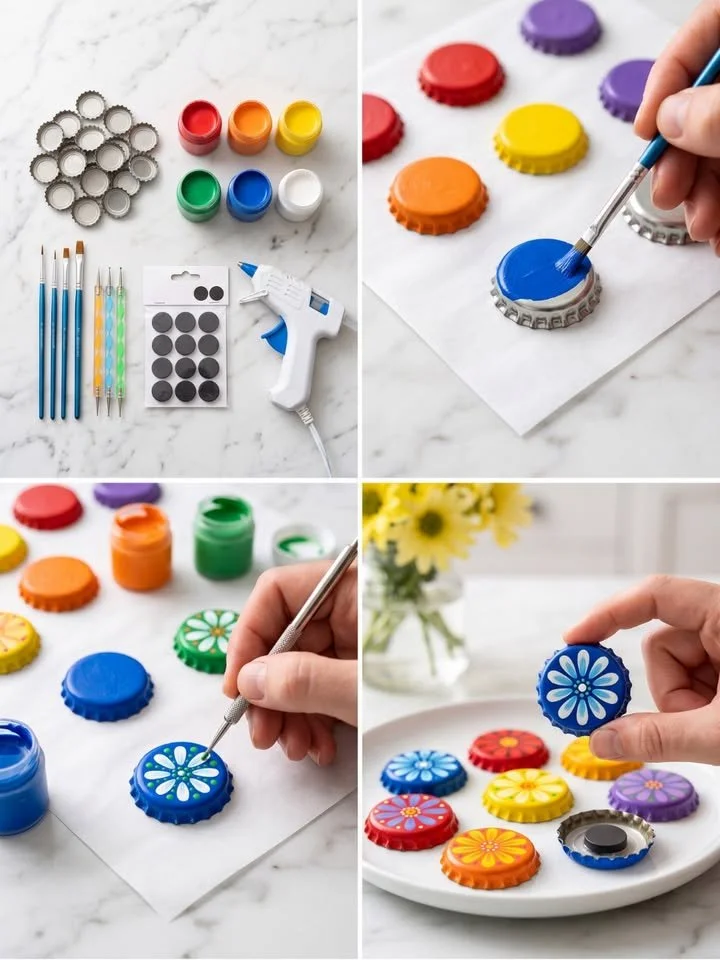
DIY Bottle Cap Flower Magnets
Transforming Bottle Caps into Cheerful Flower Magnets
Imagine a cozy Sunday afternoon, sunlight streaming through the kitchen window, painting the walls with warmth. The aroma of fresh coffee dances in the air, mingling with the sounds of laughter coming from your loved ones gathering around the table. You feel inspired to bring even more joy into your home—a spark of creativity ignites within you. What if you could transform simple, forgotten items into whimsical decor? Today, I want to share with you a delightful DIY project that does just that: turning old metal bottle caps into colorful flower magnets!
These charming little magnets are more than just a craft; they are artifacts of family fun, a celebration of sustainability, and a pop of color for your fridge, locker, or magnetic board. Each one holds a story, a moment of laughter, and a touch of handmade love. Let’s dive into the vibrant world of bottle cap flower magnets and create some cheer together!
Why Bottle Cap Flowers?
Upcycling is more than just a trend; it’s a movement fostering creativity while reducing waste. Many of us have a stash of old bottle caps lying around, remnants of evenings shared over drinks. Instead of tossing them into the recycle bin, why not give them a new life? Each bottle cap can be transformed into an eye-catching flower, a colorful emblem of personal flair that can brighten your everyday surroundings.
Not only are these magnets a fun project to engage in alone or with family, but they also teach children about recycling and the joy of creating something beautiful from nothing. Plus, they make fantastic gifts! Imagine gifting a bouquet of handcrafted magnets to a friend, each one a unique expression of your creative spirit.
Occasions to Celebrate with Your Flower Magnets
These delightful flower magnets can bring joy in various situations. They are perfect for:
- Brightening Up Your Home: Add a splash of color to your kitchen or workspace.
- Gifting: An excellent handmade gift for holidays, birthdays, or as a thank-you.
- Crafting Parties: Great fun for kids and adults alike during gatherings, fostering creativity and teamwork.
- Seasonal Decor: Change your color palette with the seasons—sunny yellows in spring, deep oranges in fall.
Gathering Your Materials
To bring this enchanting vision to life, let’s gather what we need. This project is simple yet engaging, and it proves that you don’t need expensive materials to create something special. Here’s what you’ll need:
- Clean metal bottle caps: This will be the base of your flowers. Be sure to rinse and dry them thoroughly to make sure they’re ready for paint.
- Acrylic craft paint: Choose vibrant colors like blue, red, yellow, orange, purple, green, and white. Each tone can evoke different feelings and styles—think of the blossoms you want to create and let your imagination flourish!
- Fine paintbrushes: Necessary for those delicate flower details.
- Dotting tools: You can also use the end of a paintbrush handle for creating petals and centers.
- Small round disc magnets: These will allow you to stick your beautiful creations to any magnetic surface.
- Hot glue gun and glue sticks: Essential for attaching the magnets securely.
- Parchment paper or a protective craft surface: To keep your workspace tidy while you create.
Crafting Your Floral Magnets
Now that we have all our supplies, let’s breathe life into those bottle caps! With a splash of color and a sprinkle of creativity, your fridge may soon resemble a vibrant garden.
-
Wash and Prep: Start by washing the bottle caps thoroughly to remove any residue. Dry them completely—water and paint do not mix well!
-
Base Color Application: Choose your favorite color and paint the inside of each bottle cap with a solid base. Feel free to experiment with different colors. Allow them to dry completely before moving on.
-
Design Your Flowers: With your fine paintbrush or dotting tool, add flower designs inside the caps. Use contrasting paint colors to create petal shapes and centers. Let your imagination run wild! A bright-eyed sunflower or a delicate daisy could emerge from each cap.
-
Drying Time: Patience is key—allow your painted designs to dry completely before proceeding to the next step. Take this time to admire your handiwork!
-
Attach the Magnets: Once everything is dry, grab your hot glue gun. Put a dab of glue on the inside back of each bottle cap and press a small round magnet into place. Ensure it adheres properly before moving on.
-
Final Touch: Let the glue set completely—this will ensure your magnets are as sturdy as they are beautiful.
With these easy steps, you’ll yield between 8 to 12 colorful bottle cap flower magnets ready to bloom in your home!
Helpful Tips for Success
While this project is relatively straightforward, here are a few tips to steer you clear of common pitfalls:
- Two Coats Are Better Than One: For a smoother finish, consider applying two thin coats of paint. The bottle caps can be tricky, and a second layer helps provide even coverage.
- Mix Sizes: Use different dot sizes for your petals to create more complex and detailed flower patterns.
- Seal the Deal: If you want these beautiful creations to last, consider sealing them with a clear craft sealer after drying. This will offer extra durability, especially if they are displayed in a busy kitchen.
Creative Variations to Explore
One of the best parts of DIY projects is the opportunity for personal expression. Here are a few playful variations you might try:
- Seasonal Themes: Change colors and designs based on holidays or seasons. Think pastel flowers for spring or deep red and green for the holidays.
- Personalized Messages: Use paint or small stickers to add words of encouragement or favorite quotes to the caps.
- Layering: Create a 3D effect by stacking smaller bottle caps to add dimension to your flower design.
Presentation Ideas for Your Magnets
Once your colorful magnets are done, how do you display them in a delightful way? Here are a few suggestions to consider:
- Magnetic Board: Create a floral arrangement on a magnetic board. This dynamic display allows you to swap flowers in and out for different seasons or moods.
- Fridge Decor: Group different colors together on your fridge to create a fun and festive look, or spread them around for whimsical contrast.
Storing Your Magnets
If for some reason you’re not immediately placing your beautiful creations on a magnetic surface, it’s important to store them properly. Keep your finished magnets in a small craft container to avoid damage, and store them away from heat sources that could soften the glue.
Frequently Asked Questions
-
Can I use plastic bottle caps instead?
Plastic caps can be used but painting on metal gives a better finish. Metal caps also add a more rustic charm. -
What if my paint peels?
Ensure you let your paint dry completely and consider sealing with a varnish for durability. -
Can kids join in the fun?
Absolutely! Just ensure they are supervised when using the hot glue gun and any small parts.
A Blooming Finale
Creating these DIY bottle cap flower magnets is more than a simple craft—it’s an opportunity to connect, express, and brighten up your day. You might find yourself lost in laughter with friends, or your children’s joy as they create their unique masterpieces. Each flower magnet becomes a tribute to creativity and resourcefulness, reminding us that art can bloom from the simplest of ideas. So gather your supplies, set the scene for a joyful afternoon, and let your creative spirit shine. Transform those bottle caps into cherished, colorful magnets that spread cheer wherever they go. Happy crafting!