
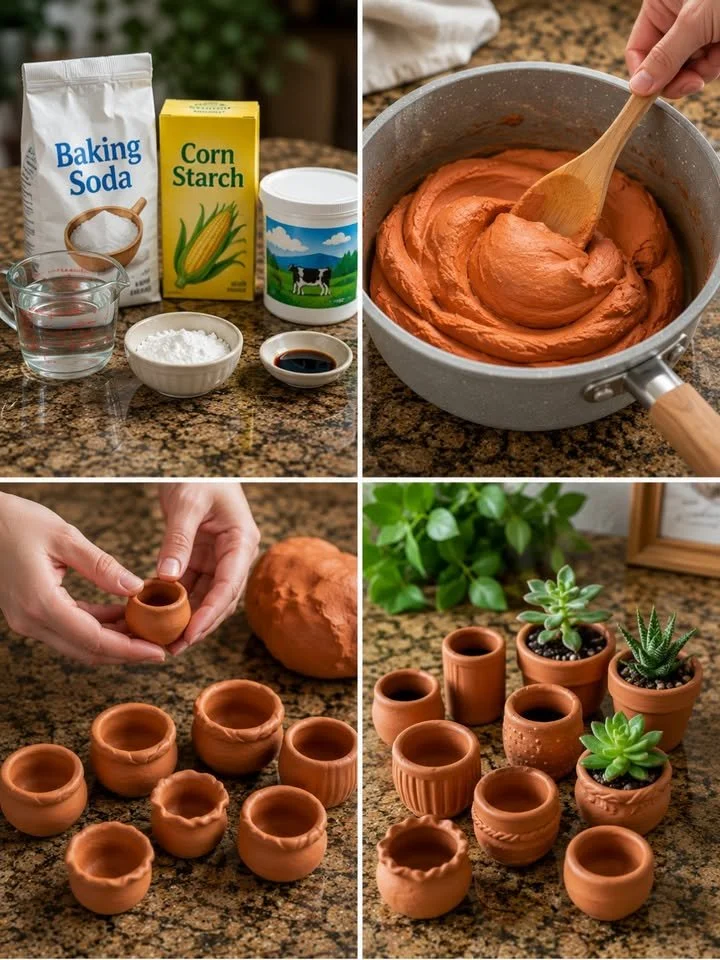
DIY Miniature Terracotta Pots 🪴✨
Crafting Miniature Terracotta Pots: A Delightful DIY Journey
Imagine a sun-drenched afternoon where you gather with friends, laughter mingling with the gentle rustle of leaves in the breeze. You set up a cozy crafting corner, filled with vibrant materials and the tantalizing scent of fresh clay—ready to unleash your creativity. Today, we’re diving into the world of DIY, focusing on an utterly charming project: creating your very own miniature terracotta pots using homemade air-dry clay. These delightful tiny pots can be perfect for fairy gardens, dollhouses, or as heartfelt handmade gifts, each one bearing the touch of your imagination.
Crafting is more than just a hobby; it’s an expression of passion, a way to create beauty with your own hands. You might be wondering why this particular project captivates so many hearts. The answer lies in the very essence of miniatures. There’s something uniquely enchanting about small creations—they possess an air of whimsy and charm that can transform the mundane into the magical. And what’s more, these miniature terracotta pots not only look adorable, but they also provide a perfect canvas for your creativity, allowing you to decorate them as you please with tiny plants, pebbles, or decorative moss.
Why People Adore This DIY Project
The joy of creating miniature terracotta pots stems from their versatility. They are welcoming additions to fairy gardens, providing a quaint touch that invites imagination and storytelling. Picture a mystical woodland scene where gnomes gather around these sweet pots, or visualize a cozy corner of your home adorned with tiny succulents nestled within your crafted creations.
Moreover, this project is an excellent way to spend quality time with family or friends, each contributing their own artistic flair. It’s a delightful activity for children and adults alike—imagine hosting a crafting afternoon birthday party where everyone leaves with their tiny pots filled with memories and laughter. With such a simple yet gratifying process, anyone can join in the fun.
The Benefits of Crafting Miniature Terracotta Pots
Creating miniature terracotta pots offers countless benefits. Firstly, this project taps into the joy of hands-on creativity, allowing you to unwind and de-stress. The rhythmic motion of shaping clay can be meditative, transforming your worries into tangible beauty.
Additionally, these pots make thoughtful gifts—after crafting them, imagine filling each with tiny succulents or sweet little treats and presenting them to friends or loved ones. They become symbols of care and creativity, perfect for any occasion, from housewarmings to baby showers.
What You’ll Need
Let’s gather our materials, each one contributing to the magic of our mini terracotta pots. Here’s what you’ll need:
- 1 cup baking soda: This is the primary ingredient, giving our clay its structure.
- 1/2 cup cornstarch: This helps create a smooth texture in the clay, essential for our pots.
- 3/4 cup water: To bind everything together.
- Brown and orange food coloring (optional): These will add a lovely terracotta hue to our pots.
- Non-stick saucepan: This will be your workspace while cooking the clay.
- Wooden spoon: For stirring our mixture.
- Measuring cups: To get the ratios just right.
- Small bowl of water: To smooth out any cracks in your pots as you shape them.
- Mini succulents, pebbles, or decorative moss (optional): For adorning your finished pots, bringing them to life.
Step-by-Step Instructions
Now that we have our materials assembled, let’s dirty our hands and get started on this delightful project!
Step 1: Make the Clay
In a non-stick saucepan, combine 1 cup of baking soda and 1/2 cup of cornstarch—the aroma of the dry ingredients is pleasantly earthy, hinting at the essence of pottery. Gradually stir in 3/4 cup of water until the mixture is smooth and free of lumps. If you’re feeling adventurous, add a few drops of brown and orange food coloring. This step not only enriches the color but also elevates the visual appeal of your final pots.
Step 2: Cook the Mixture
Place your saucepan over medium-low heat and stir constantly. It’s essential to give this your full attention—you’ll feel the texture change as the mixture becomes thick and dough-like, pulling away from the sides of the pan, creating a satisfying consistency. This process is where the magic happens, and you’ll see your creation come to life.
Step 3: Cool the Dough
Once your clay reaches the desired texture, transfer it to a plate or bowl and cover it with a damp cloth to prevent it from drying out. Allow it to cool until it’s comfortable to handle; let this moment be a time to imagine the beautiful pots you’ll soon create.
Step 4: Shape the Pots
Now for the fun part! Take small pieces of your cooled clay and roll them into little balls. With your fingers, gently pinch and shape each piece into tiny hollow pots. Feel the softness of the clay as you mold it into the precise form you desire. Use your fingers and the bowl of water to smooth out any cracks, ensuring they’re refined and polished.
Step 5: Add Details
Here’s where your creativity truly shines. Create decorative rims or textures using your fingers or simple craft tools, turning each pot into a unique work of art. Try imitating real terracotta pots by etching designs or adding patterns—let your imagination run wild!
Step 6: Dry Completely
Place your adorable creations on a tray and allow them to air dry for 24–48 hours, turning them occasionally for an even finish. As they dry, take a moment to reflect on your work and the stories these pots will soon hold.
Step 7: Display
Once dry, it’s time to bring your pots to life! Fill them with tiny succulents, colorful pebbles, or soft green moss, or simply leave them empty as charming decorative accents. Picture them on windowsills, breakfast tables, or as delightful conversation starters in your home.
Helpful Tips for Success
As you embark on this creative journey, here are some handy tips to ensure your miniature terracotta pots turn out perfectly:
- Consistency Matters: Make sure to keep the thickness of each pot uniform for a cohesive look.
- Use Small Tools Wisely: Simple household items like toothpicks or popsicle sticks can help with carving detailed designs.
- Prevent Cracking: Don’t skip the step of using a damp cloth while covering your clay; this steps ensures it stays moist and workable.
Common Mistakes to Avoid
Crafting can come with its pitfalls, especially as a beginner. Some common mistakes include:
- Overheating the Mixture: If the dough cooks too fast, it might become too dry and crumbly. Be patient and stir gently over low heat.
- Ignoring Drying Time: Rushing the drying process can lead to fragile pots that break easily. Give them the time they need.
- Neglecting Details: Don’t hesitate to invest time in designing your pots—these details can turn a simple pot into a work of art.
Creative Variations
While this tutorial focuses on terracotta pots, there are countless ways to customize your pieces. Consider painting them with vibrant colors or experimenting with embellishments like gold leaf or glitter for a touch of sparkle. Each pot can reflect a unique theme—think holiday motifs, pastel colors for spring, or bold patterns for a modern twist!
Display & Presentation Ideas
Once your pots are complete, how will you showcase them? Arrange them in a whimsical garden scene, or cluster them on a decorative tray with other handmade crafts. Consider mixing different sizes and shapes for a charmingly eclectic display that draws the eye.
Maintenance Tips
These pots are air-dry creations, which means they’re suitable for indoor use. If you choose to use them for real plants, be cautious with watering—too much moisture can cause damage. If displaying them without plants, simply dust them occasionally to keep their appearance fresh.
Frequently Asked Questions
Can I bake the clay instead of air-drying?
No, this particular clay recipe is designed for air-drying and should not be placed in an oven as it might melt or burn.
How can I ensure my pots are waterproof?
For added protection, consider sealing your finished pots with a clear non-toxic sealant if you plan to use them for plants.
What types of plants work best for these mini pots?
Succulents are ideal due to their low maintenance and small size, but you could also use tiny flowers or moss for diverse arrangements.
A Final Note of Inspiration
Creating miniature terracotta pots can be a deeply fulfilling journey, one that brings out your inner artist while fostering connection—both to the creative process and to the loved ones around you. Each tiny pot serves as a reminder of your capability to craft beauty and add a touch of whimsy to everyday life. So gather your supplies, invite a friend, and let your imaginations flourish in the warm glow of creativity. Your tiny terracotta pots await, ready to hold the dreams and stories of tomorrow.
Meta Description
Discover the joy of crafting beautiful miniature terracotta pots with our step-by-step guide using homemade air-dry clay. Perfect for fairy gardens or thoughtful gifts!
Suggested SEO Tags
- Miniature terracotta pots
- DIY air-dry clay crafts
- Fairy garden projects
- Handmade gifts
- Crafting with kids
- Home decor ideas
- Succulent potting ideas