
Melted Bead Suncatchers
Melted Bead Suncatchers: A Whirlwind of Color and Joy
Imagine a sun-drenched afternoon, where the air is filled with laughter and the soft whisper of a gentle breeze. Your children, full of curiosity and creativity, gather around the dining table, gazing at a collection of vibrant plastic beads sprawled before them. An idea ignites—a chance to transform these simple beads into stunning suncatchers that will dance with sunlight, casting twinkling rainbows across your home. This craft is not just a project; it’s a cherished memory in the making, a moment bound by laughter, creativity, and color. Let’s dive into the enchanting world of melted bead suncatchers!
The Allure of Melted Bead Suncatchers
There’s something magical about watching ordinary materials morph into captivating art. Melted bead suncatchers epitomize this transformation. Each bead, translucent and colorful, gleams with potential, waiting patiently to be melted and combined into a beautiful piece of art. When hung in a window, these suncatchers don’t just catch sunlight; they invite joy, warmth, and creativity into your home.
Parents love this DIY craft not only for its simplistic delight but also for its educational potential. Children get to explore color combinations, learn about melting points, and witness firsthand the joy of creating something lovely with their own hands. Each suncatcher becomes a beacon of individuality, showcasing unique designs that reflect the personality of its creator. And let’s be honest—what better way to brighten your living space than with your child’s colorful masterpiece dangling in the sunlight?
Benefits of Creating Suncatchers
This DIY craft serves up a banquet of benefits. Firstly, it’s incredibly easy to execute, with little mess and no arduous cleanup, making it an ideal activity for busy families. The materials are inexpensive and accessible, and the process fosters creativity and encourages imaginative expression.
Think about it: each suncatcher is not only a piece of art but also a celebration of seasons and special occasions. Whether you create star-shaped suncatchers for Fourth of July, heart designs for Valentine’s Day, or even floral patterns for spring, they serve as perfect decorations that can instantly uplift your decor. Moreover, the soft glow they emit as the sun filters through them creates an atmosphere that feels both enchanting and cozy.
Gather Your Materials
Now, let’s gather our supplies! This craft is straightforward, but having the right materials on hand will make your experience smoother and more enjoyable:
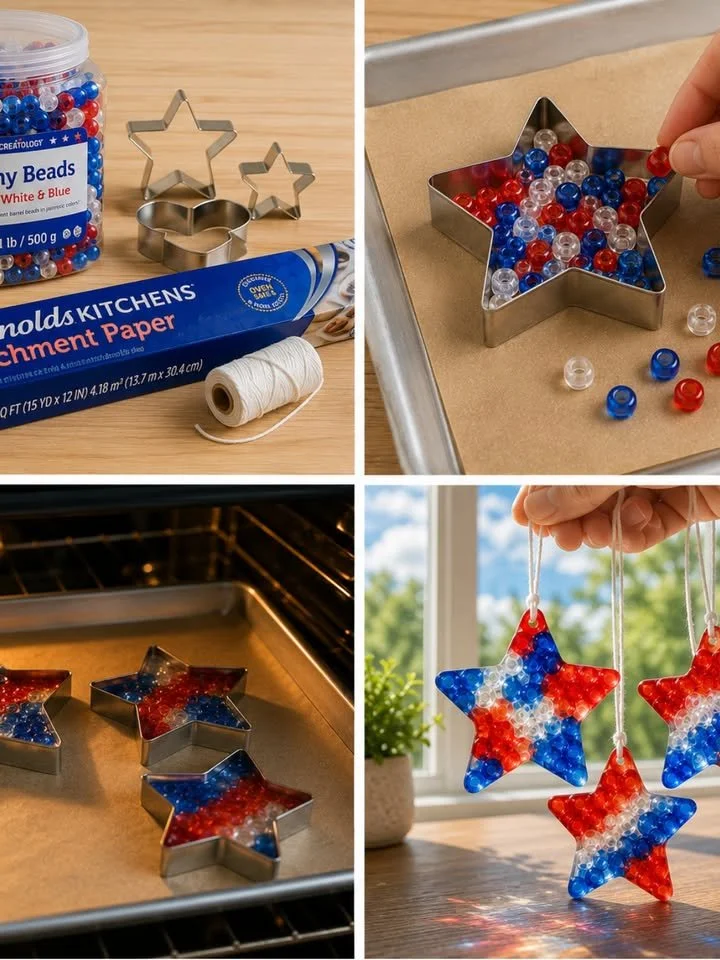
- Translucent plastic pony beads: You can choose red, white, and blue for a patriotic theme or pick a rainbow of colors tailored to your home’s aesthetic.
- Metal cookie cutters: Star shapes are exceptionally delightful, but let your imagination roam! Hearts, circles, and flowers can all work beautifully.
- Parchment paper: This will ensure your beads don’t stick to the baking sheet while they transform.
- Baking sheet: A staple in every kitchen, perfect for this project.
- Cotton twine or string: This is essential for hanging your creations when they’re finished.
- Scissors: To trim the string, of course.
- Oven: The magic appliance that will melt the beads to perfection.
Helpful Tip:
It’s advisable to check the packaging of your beads for melting instructions to ensure a perfect outcome!
Step-by-Step Instructions: Crafting Your Suncatchers
Creating melted bead suncatchers is like a beautiful dance of steps leading to a radiant finale. Let’s embark on this colorful journey together!
-
Preheat Your Oven: Set your oven to 200°C (400°F). You want it nice and toasty, but not too hot; we are melting, not charred!
-
Prepare Your Baking Sheet: Line a sturdy baking sheet with parchment paper, creating a clean canvas for your beads.
-
Arrange Your Cookie Cutters: Place your metal cookie cutters on the parchment paper. Don’t be shy; pick shapes that resonate with the season or occasion!
-
Fill with Beads: Carefully fill each cookie cutter with a single layer of pony beads. Arrange them in any pattern that speaks to your creative heart—just remember to keep them flat and avoid stacking.
-
Into the Oven They Go: Gently transfer the baking sheet to the oven, allowing the beads to melt. Keep your eyes on them; they need about 8–12 minutes to transform. It’s mesmerizing to watch them slowly soften and merge into a glossy pancake of color.
-
Cooling Time: Once they are melted and gleaming, carefully remove the tray and let the suncatchers cool completely for about 20–30 minutes. Resist the urge to touch them while hot; you wouldn’t want to mar those delicate shapes!
-
Final Touches: After cooling, gently remove the hardened suncatchers from the cookie cutters. If your shapes have little holes, great! Thread your cotton string through. If not, you can tie the string around the edge.
-
Hang and Admire: Find a sunny window, hang your suncatchers, and watch as they cast magical light reflections across the room. It’s a moment of pure joy!
Common Mistakes and Helpful Tips
As thrilling as this craft is, a few common pitfalls can be easily avoided. Firstly, avoid overfilling your cookie cutters—keeping the beads in a single layer will ensure better melting and fewer mishaps. Secondly, resist the temptation to peek too early; removing the suncatchers too soon can result in messy shapes that won’t hold their form.
For the best aesthetic, consider creating a series of suncatchers in a color gradient or theme. You could create an ombre effect by gradually changing colors, adding an elegant touch to your decor.
Exploring Creative Variations
The beauty of melted bead suncatchers lies in their versatility. Have fun experimenting! How about a holiday-themed suncatcher? For Christmas, you could use greens, reds, and golds to create ornaments. For Halloween, vibrant oranges and blacks can create a hauntingly beautiful piece.
You could also personalize them with initials or small shapes cut from cardstock to insert into the cookie cutter before filling with beads. The possibilities are endless!
Storage and Maintenance Tips
If you find yourself with leftover suncatchers or wish to create more, simply store them in a cool, dry place, away from direct sunlight until you’re ready to hang them. They’re durable, but a little care will ensure they last as bright and cheerful decor pieces.
Frequently Asked Questions
Can I use any type of beads?
Using plastic pony beads is recommended, as they melt beautifully and give a stained-glass effect. Avoid using beads that aren’t specifically designed for melting, as they may not have the same results.
How long do these suncatchers last?
With proper care, your cheerful creations can last indefinitely—just be mindful of where you hang them. Keep them away from strong elements like heavy winds or rain.
Will the colors fade over time?
While the colors may lose some vibrancy after prolonged exposure to sunlight, they typically retain their beauty well. You can always make new ones if you want to refresh your windows!
A Colorful Conclusion
Crafting melted bead suncatchers is more than just a project; it’s an invitation to connect, laugh, and cherish the fleeting moments with loved ones. The radiant colors, the soft light casting whimsical shapes on your walls, and the pride of creating something beautiful with your own hands—these are priceless treasures that infuse warmth into your home.
So gather your materials, invite your family to join in, and let your creativity flow. Create a little piece of art that brightens your day and your surroundings. After all, every time the sun hits those glossy beads, it’s a reminder of the love and joy woven into every handmade masterpiece. Happy crafting!
SEO Meta Description
Create vibrant melted bead suncatchers with this easy DIY guide, perfect for families and all occasions. Transform plastic beads into stunning decor that lights up your home!
Suggested SEO Tags
melted bead suncatchers, DIY crafts, children’s crafts, sunny window decor, colorful suncatchers, family activities, creative projects