
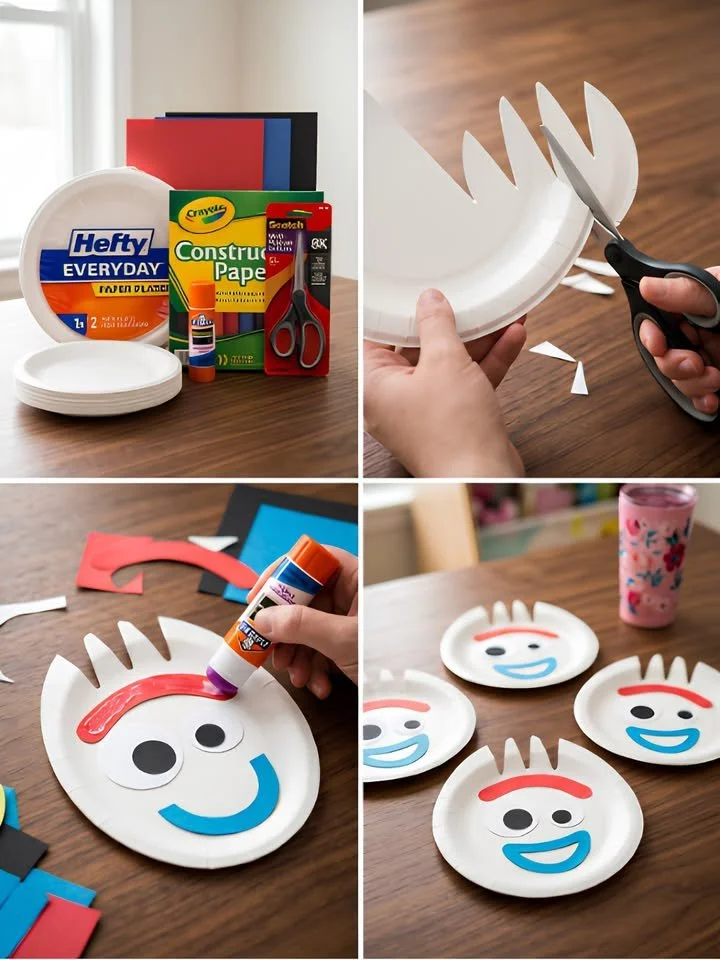
DIY Forky Paper Plate Craft
Bring Forky to Life: A Fun DIY Paper Plate Craft for All Ages
Imagine a rainy afternoon, the sound of gentle raindrops tapping against your window, and the warm glow of your living room inviting creativity to come alive. You gather around the dining table with your little ones, the laughter echoing as you dive into a craft project that promises not only fun but also a sprinkle of nostalgia. Today, we’re channeling the spirit of the lovable Forky from Disney-Pixar’s Toy Story 4, crafting adorable characters that are bound to bring smiles and spark imaginative play.
Crafting with paper plates is a simple yet deeply satisfying way to engage kids, and who wouldn’t want their own quirky little Forky to join the family? This DIY Forky paper plate craft is more than just a fun afternoon activity; it’s an expression of creativity and a delightful addition to any toy collection.
Why Everyone Loves This Craft
Forky, with his wide smile, googly eyes, and curious personality, quickly became a fan favorite among both children and adults. There’s something undeniably charming about him, and perhaps that’s why we are drawn to replicate his spirit in our crafts. Not only do kids love creating characters inspired by their favorite movies, but this project also nurtures creativity and fine motor skills.
This paper plate craft serves multiple purposes. It’s perfect for children’s parties, where each child can make their own Forky and take it home as a unique party favor. It’s also a fantastic rainy-day activity that keeps little hands busy while fostering a sense of accomplishment. And let’s not forget about themed movie nights! A cute Forky character adds a delightful touch to the atmosphere, elevating the fun and engagement level for everyone involved.
The Perfect Materials for Our Craft
Before we embark on this crafting adventure, let’s gather our materials. You’ll need:
- 4 white paper plates – the cornerstone of our adorable Forky.
- Red construction paper – to bring Forky’s playful eyebrows to life.
- Blue construction paper – perfect for his cheerful smile.
- Black construction paper – essential for those endearing googly eyes.
- White paper or white construction paper – for additional eye details.
- Glue stick – to stick all the parts together.
- Scissors – for cutting shapes and details.
- Pencil (optional) – helpful for those who may want to trace their shapes for precision.
These materials are commonly found around the house or in local craft stores, making this project not only accessible but also easy to prepare for.
Step-by-Step Instructions
Now, let’s dive into our craft! Gather your materials and bring your creativity to the forefront as we create Forky.
-
Prepare Your Forky’s Body: Start by placing a paper plate on your work surface. With your scissors in hand, carefully cut four large pointed tines into the top edge of the plate. This will resemble Forky’s spork shape beautifully, giving him that signature quirky look.
-
Crafting the Eyes: Next, cut out two large circles from the white paper and two smaller circles from the black paper. These will create Forky’s adorable eyes! Glue the black circles directly onto the white circles for that classic googly-eyed effect.
-
Attach the Eyes: With gentle hands, glue the completed eyes onto the center of the plate. For a playful touch, position them slightly uneven, just like Forky’s own unique style.
-
Give Him a Personality with Eyebrows: Slice a curved eyebrow shape from the red construction paper. This feature is crucial, as it adds to Forky’s expressive personality. Glue this eyebrow shape above the eyes, allowing Forky to showcase a range of emotions in his playful character.
-
Add a Smile: Cut out a crescent-shaped smile from the blue construction paper—it’s time to add some cheer to your creation! Glue this below the eyes, and watch how it instantly brings Forky’s character to life.
-
Let It Dry: Before jumping back into playtime with your new creation, allow the glue to dry completely. It’s crucial for ensuring your Forky stays intact and ready to adventure with you!
Tips to Enhance Your Crafting Experience
As you maneuver through the crafting process, keep these helpful tips in mind:
-
Make It a Team Effort: Encourage your children to add their personal touch. They can innovate with colors, patterns, or even create their distinct Forky-inspired characters. Emphasizing creativity will enhance their pride in the project.
-
Use Alternatives for Eye Variations: If you want to get extra creative, try using googly eyes or stickers for a three-dimensional twist. This small change can breathe new life into your creation!
-
Embrace Imperfection: Not every cut has to be perfect, and not every eye has to be exactly the same. Embrace the beauty of handmade crafts!
Avoid Common Mistakes
For a seamless crafting experience, be mindful of a few common pitfalls:
-
Rushing the Glue: Giving time for the glue to dry might seem tedious, but rushing this step can lead to parts falling off. Ensure the kids understand the importance of patience in crafting.
-
Using Too Much Glue: While it might be tempting, a little glue goes a long way! Using excessive amounts can cause messiness and slow down the drying time.
Creative Variations to Try
Once you and your little ones have mastered the basic design, why not explore some creative variations?
-
Seasonal Themes: Incorporate holiday motifs! Christmas Forky could wear a tiny Santa hat, or maybe Forky could sport a pumpkin face for Halloween.
-
Forky’s Friends: Challenge yourselves to create a whole cast of characters from Toy Story, like Woody or Buzz Lightyear, using different base shapes and colors.
Final Touches and Presentation Ideas
When all crafting is done and Forky is ready for display, gather your little artists around to show off their creations! Consider setting up a mini art gallery with all the Forkys on the dining table, complete with creative names for each character. This not only celebrates their work but also enhances their appreciation for the effort that goes into crafting.
FAQs About DIY Forky Paper Plate Craft
What if I don’t have all the colors of construction paper?
No worries! Feel free to substitute colors with what you have at home or even use markers to draw the facial features directly onto the plate.
How can I store my finished Forky crafts?
Keep your Forky creations in a dry place, perhaps in a decorated box or a simple shelf, where they can be proudly displayed for all to see.
Crafting Memories
As you look at your completed Forky creations, take a moment to appreciate the laughter, creativity, and love that filled your crafting session. This isn’t just about making a paper plate character; it’s about connection, imagination, and the pure joy of creating something together.
So the next time the skies are gray, or you’re preparing for a delightful movie-themed gathering, revisit this DIY Forky paper plate craft and let your creativity shine—and let Forky’s spirited personality light up your home once again. Happy crafting!
Meta Description: Create your own adorable Forky-inspired characters using paper plates and construction paper in this fun DIY craft. Perfect for kids’ parties or creative rainy afternoons!
SEO Tags: DIY craft, paper plate craft, Forky craft, kids’ activities, Disney crafts, family fun, movie-themed crafts