
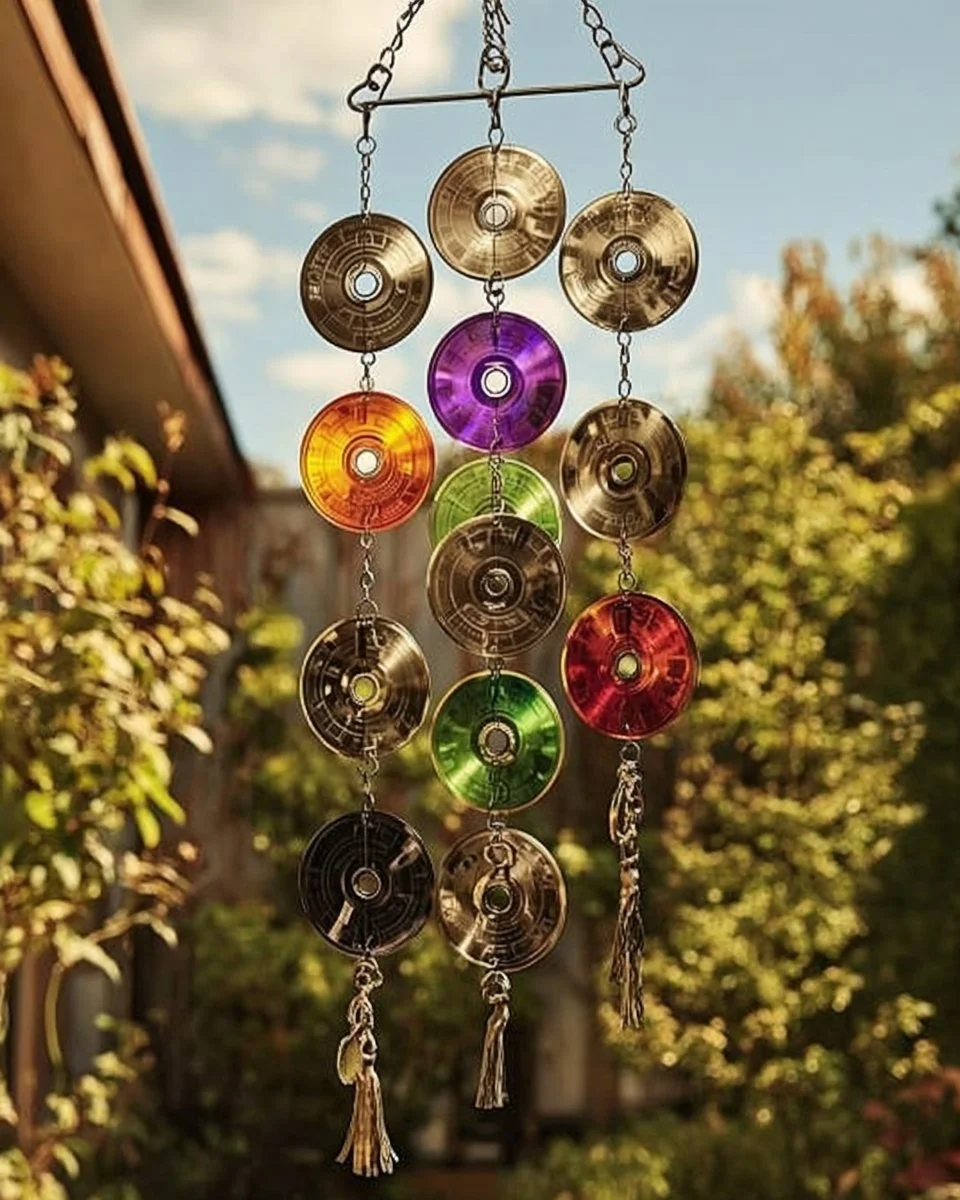
Transform Old CDs into Charming DIY Wind Chimes – Easy Craft Project
Unlock Your Creativity with a Simple DIY CD Wind Chime Tutorial
Picture this: a serene afternoon, the sun is glimmering through the trees, and you have a moment of tranquility in your backyard. You’re surrounded by the gentle rustle of leaves, the soft buzz of bees, and suddenly—music. It’s the delicate tinkling of a wind chime, dancing in the breeze and filling the air with sweet, melodic notes. There’s something magical about the way these chimes can transform an ordinary space into a personal retreat, all while donating a sense of whimsy and charm.
Now, imagine that this beautiful infusion of sound is not just thrifted from a store but is something you created with your own hands. Today, I’m excited to share with you a delightful DIY project that allows you not only to embrace your creativity but also to recycle old CDs gathering dust in your drawer. With just a few materials and a sprinkle of imagination, you can craft a stunning wind chime that reflects your unique style.
Why People Love This Idea
In a world that often feels rushed and overcrowded, there’s an undeniable allure to creating something beautiful and personal with our own hands. DIY projects like this CD wind chime not only recycle materials that might otherwise end up in a landfill, but they also give us a sense of accomplishment and joy. Each chime you hang tells a tale—of musical afternoons, of breezy days, and lazy evenings spent in contented reflection.
Moreover, the sounds produced by a wind chime can actually have a calming effect on our minds. Imagine standing in your garden or on your porch, listening to the soft tinkling as you sip a refreshing iced tea, feeling those worries melt away with each gentle note. And this DIY project means you can customize it to suit your aesthetic, whether that’s vibrant and colorful or soft and minimalist.
Benefits and Best Occasions to Use It
Creating a CD wind chime does more than just provide delightful sounds; it also offers a plethora of benefits. One of the most rewarding parts is the sustainability factor—you are actively participating in reducing waste and nurturing the environment. Additionally, it’s an excellent way to showcase your personality in your home and garden. Customization options are abundant, allowing you to choose colors and motifs that resonate with your style.
This wind chime project can also serve as a beautiful gift, perfect for housewarming events, birthdays, or even just a thoughtful surprise for a friend. Imagine gifting someone a piece of art that sings; it’s bound to add a spark of joy to their day.
Materials You’ll Need
Before we dive into the step-by-step guide, let’s gather the materials. Here’s what you’ll need for this charming wind chime project:
- Old CDs (10-12)
- String or fishing line (clear or colorful)
- A pair of scissors
- A drill or a sharp tool (like a screwdriver)
- A colorful hanger (you can use a metal ring or a coat hanger)
- Optional embellishments: beads, painted designs, or ribbon
The great thing about this project is that it requires very little—just a few items you likely have around your home! This encourages a sense of resourcefulness, sparking our creativity to come up with unique additions.
Step-by-Step Instructions
Ready to turn those forgotten CDs into a harmonious delight? Let’s get started with these easy, step-by-step instructions.
-
Prep Your CDs: Begin with selecting the CDs you want to use. Gather a colorful assortment or go for a monochromatic scheme—whatever speaks to you! Next, clean them off with a soft cloth to remove any dust.
-
Drill Holes: Use your drill (or if you’re being resourceful, your screwdriver) to make a small hole in the top of each CD. This will be where you thread your string. Be sure to do this carefully; you want to avoid cracking the CD. If you’re concerned, consider placing a cloth underneath to absorb the pressure while drilling.
-
Cut String to Size: Decide how long you want your chimes to hang. Generally, you might want to cut lengths of string between 12-18 inches. Adjust according to your preference; longer strings will create a different visual effect.
-
Thread the CDs: Take one of your strings and thread it through the hole in your first CD. Tie a knot to secure it. Repeat this step for each CD, spacing them out as desired. Some may hang lower, while others may cluster towards the top.
-
Create the Hanger: Now, gather the ends of your string together and tie them to your hanger at the top. Ensure they are centered so that your wind chime will hang straight.
-
Add Embellishments: This is where your creative flair can shine! You might want to add colorful beads to the strings between CDs, or even paint the surface of the CDs with beautiful designs before hanging them. Personal touches elevate the overall aesthetic.
-
Hang and Enjoy: Find the perfect spot for your new wind chime! Whether it’s on the porch, in the garden, or near a window where the light dances through the CDs, enjoy the sweet melodies every time the wind blows.
Helpful Tips Throughout the Project
- While drilling, start with a short and controlled motion before applying more pressure. This minimizes breakage.
- If you don’t have a drill, one can easily ask a neighbor or friend for help—the sense of community can often add to the joy of crafting!
- Experiment with different lengths of string to create varying sounds and visual effects.
Beginner Mistakes to Avoid
Many first-time DIYers often overlook the importance of spacing their CDs. If they are too close together, they may not chime effectively, and if they are too far apart, they might look less aesthetically pleasing. Take your time in arranging before securing everything in place.
Also, be mindful of where you hang your wind chime—avoid places where the wind is too harsh or where debris can gather.
Creative Variations
Your wind chime can be as unique as you! Consider experimenting with:
- Adding Color: Paint the CDs with acrylic paint in hues that complement your garden or home.
- Textures: Include different materials such as feathers, leaves, or shells to create a mixed-media display.
- Form: Instead of a traditional circular chime, think about a layered effect or even a spiraled design.
Presentation Ideas
Once your beautiful wind chime is complete, think about how it can be presented. Hang it in a place where the sun’s rays will catch its surface, creating a glimmer of color that dances throughout the day. Group it with potted plants or floral arrangements for a charming layered aesthetic.
Consider making a few to gift to friends—each chime can be tailored to the recipient’s favorite colors or styles, adding a personal touch that makes receiving the gift even more special.
Frequently Asked Questions
-
How durable is the wind chime?
The wind chime constructed from CDs is relatively durable, but exposure to the elements can wear it down over time. Bringing it indoors during severe weather can help prolong its life. -
Can I make a wind chime without CDs?
Absolutely! You can substitute other materials such as tin cans, glass bottles, or even wood to create variations. -
What can I use to decorate the chimes?
Consider using paint, markers, or stickers. You can even decoupage designs onto each CD to truly make them your own.
In Conclusion: Unlock Your Creativity
Crafting a CD wind chime is more than just a project; it’s an opportunity to reconnect with your creativity, to recycle and repurpose materials, and to create something beautiful for your home or garden. As you hang your delightful creation, let it serve as a reminder of the joy of making, the beauty of nature, and the soothing melodies that linger in the air.
So gather your old CDs, let your imagination run wild, and enjoy the serene sounds and beauty of your very own DIY wind chime. Each gentle note will resonate not just outside your home but within your heart, creating a beautiful harmony in your life.
Take a moment today to craft, relax, and relish in the sweet sounds of creation. Happy crafting!
SEO Meta Description
Unlock your creativity with this simple DIY CD wind chime tutorial! Reuse old CDs and create a beautiful decorative piece that fills your home and garden with soothing sounds.
Suggested SEO Tags
- DIY Crafts
- Wind Chime Tutorial
- Reuse Old CDs
- Home Decor Ideas
- Sustainable Living
- Garden Decorations
- Creative Upcycling