
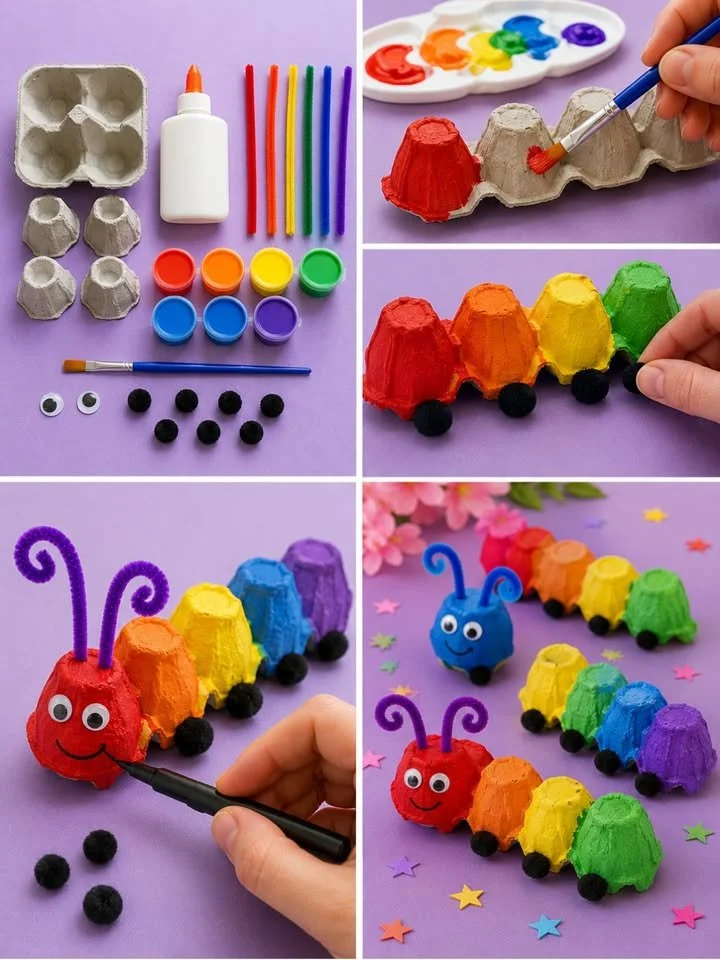
Rainbow Egg Carton Caterpillars
Crafting a Rainbow of Joy: The Adorable Egg Carton Caterpillar 🐛🌈
Imagine a sun-drenched afternoon, laughter spilling over from your child’s art station as they delve into the vibrant world of colors, transforming the mundane into something magical. This scene invites warmth into your home, and with a little creativity, you can turn an ordinary paper egg carton into an irresistible rainbow caterpillar. This charming craft not only sparks joy but also becomes a delightful gateway to teaching kids about colors and enhancing their fine motor skills. Let’s dive into the enchanting journey of crafting Rainbow Egg Carton Caterpillars together!
The Magic of Crafting
Why do we adore crafting with kids? Perhaps it lies in the pure joy of creation, where messy hands and paint-splattered canvases symbolize unbridled creativity. Or maybe it’s witnessing childlike wonder unfold as they see their ideas come to life. Crafts like our Rainbow Egg Carton Caterpillar are special because they bridge these moments of joy with learning. The vibrant colors ignite imagination, while the tactile experience blends artistic expression with dexterity, making it an ideal craft for little hands.
Why Rainbow Caterpillars?
Crafting isn’t just about creating; it’s about connection. Rainbow Egg Carton Caterpillars are perfect for playful afternoons with family, birthday parties, or even themed playdates. They serve as a symbol of transformation—just as caterpillars become butterflies, children’s imaginations can soar when given the right tools. This craft invites storytelling, inviting kids to invent little tales about their caterpillars and their colorful adventures. It’s more than a craft; it’s a canvas for creativity!
Gather Your Supplies
Before diving into the crafting process, let’s gather the supplies that will bring our whimsical caterpillar to life. Here’s what you’ll need:
- 1 paper egg carton: The foundation of your caterpillar. It’s sturdy yet flexible, offering a perfect base for all your artistic endeavors.
- Acrylic craft paints in rainbow colors: Red, orange, yellow, green, blue, and purple. These colors will not only brighten your caterpillar but also illuminate your child’s imagination.
- Paintbrush: For a smooth application of paint, letting the colors blend dramatically.
- School glue: Essential for attaching those adorable little details.
- Googly eyes: Two per caterpillar for a dash of personality and whimsy.
- Small black pom-poms: These will transform into the caterpillar’s charming feet.
- Pipe cleaners: For the delightful antennae that add character.
- Black marker: To give your caterpillar a cheeky smile.
- Scissors: For precise cuts (adult supervision required, of course!).
Step-by-Step Instructions
Now that we have our supplies, let’s embark on this delightful crafting adventure.
Step 1: Cut the Egg Carton
Start by cutting a strip of 4-6 connected egg carton cups. This will form the caterpillar’s body—think of it as the caterpillar’s cozy little home. Allow kids to help with the cutting if they’re able, but be sure to supervise closely!
Step 2: Paint the Caterpillar
Here comes the thrilling part! With your paintbrush in hand, let your child paint each section of the egg carton in a different vibrant color. Encourage them to explore and experiment with shades. The more colorful, the better! Once painted, set them aside to dry completely, creating a vivid tapestry of rainbow hues.
Step 3: Add the Feet
Once your caterpillar’s body is dry, it’s time to add its little feet! Apply dollops of glue along the bottom edges of the egg carton cups and gently press the small black pom-poms onto the glue. These feet will bring your caterpillar to life, giving it a sense of movement and character.
Step 4: Make the Face
Now, let’s add some charm. Take two googly eyes and glue them onto the front section of your caterpillar. With a black marker, draw a cute, smiling mouth—don’t forget to bring it to life with a twinkle in each eye! This step is where personality shines through. Encourage your child to even give their caterpillar a name!
Step 5: Add the Antennae
Take a pipe cleaner and cut it in half. Twist the ends into whimsical curls and glue or poke them into the top of the head section of your caterpillar. Watch as it transforms into a vibrant, animated creature ready to explore!
Step 6: Let It Dry
Patience is key. Allow all the glue to dry completely before displaying or playing with your caterpillar. Once set, your little ones will be eager to show off their new colorful companion!
Helpful Tips for Crafting Success
As with any craft, some tips can smoothen the process. Encourage your child to explore mixing colors if they want to create new shades—this adds an element of surprise! If paint spills happen (they often do!), keep some warm, soapy water and cloths nearby for quick clean-ups.
Avoid rushing through the steps; let children enjoy each phase, for it is in the journey that their creativity flourishes. Stepping back and taking breaks often brings fresh ideas!
Creative Variations
Feeling adventurous? Spice things up by introducing:
- Texture: Add shredded paper or fabric scraps for a mixed media experience.
- Theme: Decorate the caterpillar with glitter or stickers to align with seasonal themes like Halloween or Christmas.
- Different Creatures: Use the same concept to craft other critters like butterflies or ladybugs using different color schemes.
Presentation & Display Ideas
Once your caterpillar is complete, consider how to showcase it. A simple display on a mantel or a handmade craft corner makes a lovely addition to your home decor. You can even create a “caterpillar family,” with each family member sporting a unique color combination.
For special occasions, make these caterpillars as party favors or use them in games. Encourage kids to build stories and worlds around them.
Frequently Asked Questions
Q: Can we use different materials other than egg cartons?
Absolutely! Any sturdy base will do: toilet paper rolls, cardboard, or even old tin cans can be fun alternatives.
Q: What age is this craft suitable for?
This craft is perfect for kids aged 3 and up, while parental supervision is essential for younger children, especially during cutting.
Q: How can we preserve our caterpillar?
While these creations are best enjoyed fresh, a spray sealant can help in preserving the colors if you’d like to display them longer.
A Journey of Color and Connection
As you gather around the crafting table, the rainbow of colors before you, remember that this isn’t just about creating a caterpillar. It’s about nurturing the bonds of creativity and communication with our children. As the paint dries and the excitement builds, you’re not just crafting a colorful critter; you’re crafting memories. Embrace the joy that comes with a bit of mess; after all, it’s in those delightful moments that magic truly happens.
So, take a deep breath, gather your family, and let the colors of creativity sprinkle joy throughout your home. Who knew a simple egg carton could hold the beginnings of laughter-filled conversations and colorful tales? Dive into this adventure, and watch your little ones flutter into an artistic realm of their own! Happy crafting!