
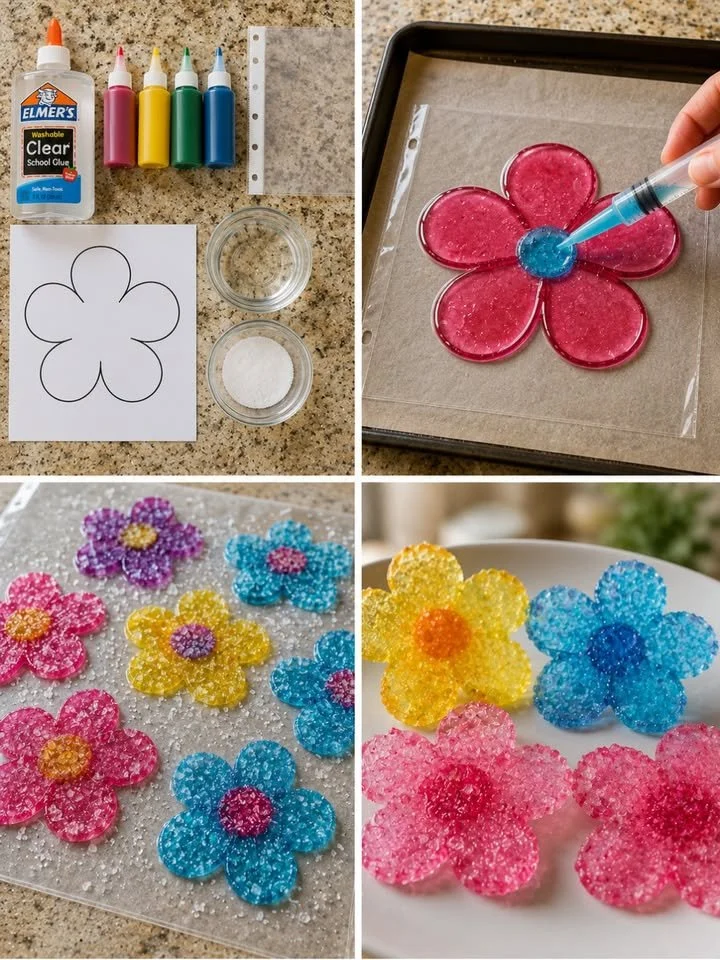
Faux Stained-Glass Glue Flowers 🌸✨
A Crafty Afternoon: Making Faux Stained-Glass Glue Flowers 🌸✨
Imagine a cozy Saturday afternoon, sunlight streaming through your windows, casting playful glimmers across the dining table where you and your child are ready to dive into a new creative venture. The air is filled with a sense of relaxed anticipation. With a few simple materials at your fingertips, your day is about to transform into a delightful excursion into color and creativity. Today, we’re crafting stunning faux stained-glass flowers using colored glue — a project that’s as magical as it is easy!
These translucent blooms mimic the beauty of frosted glass, and they serve not just as decorative elements but also as a means to spark your child’s imagination. As you work together to create these little works of art, the process will not only enhance your crafting skills but also weave beautiful memories — the laughter, the colors, and the shared joy of creativity.
Why People Love This Idea
The joy of creating something beautiful is a universal delight, and faux stained-glass glue flowers are perfectly designed to captivate both young hearts and the young-at-heart. With each swirl of color, your child will experience a sense of ownership and pride as they bring their vision to life. Furthermore, this craft is both approachable and rewarding, requiring minimal materials and offering maximum impact.
As the flowers dry and take on their alluring translucent quality, they become a source of wonder — it’s like capturing a bit of magic in your hands! Plus, they make charming window decorations, casting shimmering colors across the room as sunlight filters through them. Children love to show off what they’ve made, making these flowers the perfect gift for family members or friends.
The Benefits and Best Occasions to Use It
This project is ideal for a host of occasions: rainy days, birthday parties, or simply as an enriching after-school activity. It offers several benefits beyond sheer enjoyment:
- Develops Fine Motor Skills: The act of squeezing glue and manipulating colors enhances dexterity and hand-eye coordination.
- Encourages Creativity: With endless color combinations and shapes, children can freely express their imaginations, leading to unique creations.
- Promotes Patience: Waiting for the flowers to dry teaches young ones the value of patience and anticipation.
Gathering around the crafting table will bring your family closer while fostering a love for art and creativity.
Materials You’ll Need
Before you embark on this flower-making adventure, gather the following items:
- Clear washable school glue: This is crucial for the base of our creations.
- Food coloring: Opt for vibrant shades like pink, yellow, blue, and green, or explore your own palette.
- Fine salt: To create that magical, frosted texture.
- Clear plastic sheet protector or plastic wrap: This will serve as our canvas.
- Flower template or simple flower drawing: Get creative with flower shapes!
- Parchment paper or baking sheet: Perfect for the drying stage.
- Small bowls or cups: For mixing colors.
- Toothpicks or craft sticks (optional): These can help spread the glue if needed.
Step-by-Step Instructions
Now that you have everything ready, let’s dive into the steps. Get your little artist ready to explore the world of colors!
Step 1: Prepare the Colors
Start by dividing the clear glue into small bowls. Add a few drops of your chosen food coloring to each bowl and stir carefully. Watch as the glue transforms into vibrant shades, creating a small rainbow at your crafting station. The excitement in your child’s eyes as they mix colors is truly priceless!
Step 2: Set Up the Template
Place your flower template underneath a clear plastic sheet protector. This will allow you to trace the design without it getting ruined. It’s always fun to peek at the template and imagine how your flower will look!
Step 3: Create the Outline
Using colored glue, carefully trace the outline of the flower directly onto the plastic sheet. Don’t rush this part; the artistic flow will feel more rewarding as you enjoy the gentle squeeze of the glue. Your little one can join in the fun, adding their personal touch as they create their unique designs.
Step 4: Fill the Flower
Now, it’s time to fill in the petals and center with additional colored glue. Encourage your child to experiment with how to apply the glue — squeezing it straight from the bottle can be thrilling! They can use a toothpick or craft stick to spread the glue evenly, adjusting the thickness to create visual interest.
Step 5: Add Sparkle
This step is where the magic truly happens! It’s time to sprinkle fine salt lightly over the wet glue. As the salt settles on the glue, it will create a stunning frosted, crystalline texture that mimics real stained glass. Your children will be delighted as the salt clings to the colorful glue, transforming their flowers!
Step 6: Let Dry
Now comes the hardest part: waiting! Allow the flowers to dry completely, which usually takes 24–48 hours depending on thickness. Encourage your little ones to set a timer to count down the hours — this anticipation teaches them the delight of patience, and it builds excitement for the reveal.
Step 7: Remove and Display
Once fully hardened, gently peel the flowers from the plastic sheet. Cue the applause! These little masterpieces can be displayed on a windowsill, where the sunlight will dance through them, or you can use them as delightful ornaments. Share the joy of your child’s artistic creations with friends and family.
Helpful Tips Throughout the Process
- Be Creative with Colors: Encourage mixing colors for unique shades. What happens when you blend blue and yellow? 🌼
- Experiment with Shapes: Flowers don’t have to be traditional; try different shapes for alternative results.
- Use a Light Hand with the Salt: Too much salt may weigh down the design, so go lightly for that frosted effect.
Beginner Mistakes to Avoid
- Overfilling the Flowers: If the glue pools, the drying time will take longer, and the flower may lose its form.
- Not Using Enough Salt: This could mean missing out on that magical frosted effect, so don’t skimp!
- Rushing the Drying Process: Be patient, as hardening is essential for the final outcome. Your perseverance will be rewarded!
Creative Variations
Once you get the hang of it, why not explore new avenues? Consider creating different shapes such as butterflies, stars, or even geometric patterns. Use the same technique but change the templates to ensure endless crafting fun!
Storage Tips
After your crafting adventure, store the finished flowers flat in a dry place, away from moisture and direct heat. This way, they’ll maintain their beauty and stay intact for the little hands that made them!
Frequently Asked Questions
Can I use glitter instead of salt?
You can, though you may not achieve the same frosted effect — glitter adds a sparkly finish instead.
What if I don’t have food coloring?
You can experiment with different liquid watercolors or even natural dyes from fruits and vegetables if you’re looking for a creative twist!
How do I clean up the glue?
If spills occur, a damp cloth will do the trick, especially if you act fast.
Final Thoughts
Crafting faux stained-glass glue flowers is more than just a fun project; it’s an opportunity to connect, create, and cherish moments together. These lovely creations will brighten any room, reminding you of the joy found in simple, shared activities. So gather your materials and embrace the artistic adventure awaiting you. With each splash of color and every sprinkle of salt, you are not just making beautiful flowers; you are cultivating imagination, patience, and cherished memories. Happy crafting! 🌸✨
SEO Meta Description: Discover the magic of creating faux stained-glass glue flowers with this charming crafting guide. Perfect for kids and family bonding, this easy project brightens any space!
SEO Tags: faux stained-glass flowers, kids craft ideas, creative activities for children, fun DIY projects, colorful craft ideas, floral decorations, family time activities.