
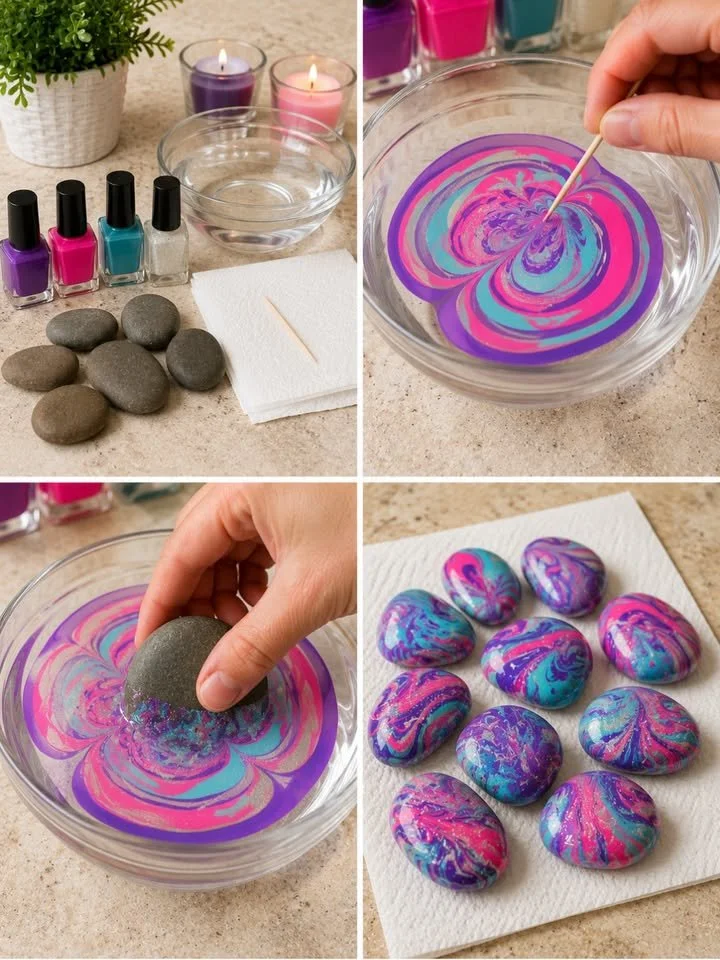
DIY Marbled River Stones
DIY Marbled River Stones: A Cherished Craft Adventure 🌊🎨✨
Imagine gathering around a sun-drenched table on a lazy Saturday afternoon, laughter bubbling as you and your loved ones dive into a new creative project. The air is rich with possibility and the scent of freshly brewed coffee wafts in from the kitchen. In front of you lies a simple collection of smooth river stones, just waiting to be transformed into something extraordinary. Today, we are embarking on a delightful journey that will awaken our inner artists and leave us with a colorful keepsake: marbled river stones infused with vibrant, swirling colors.
There’s something inherently captivating about marbling. It feels both organic and otherworldly, reminiscent of the intricate patterns found in nature—think veins of colorful minerals or the tides of a sunlit ocean. Each stone becomes a unique work of art, a testament to personal creativity and the joyful process of hands-on crafting. Whether you’re creating charming paperweights for your home office or whimsical garden decor that dances in the sunlight, these marbled stones will add a dash of enchantment to your life.
Why DIY Marbled River Stones?
Crafting marbled river stones isn’t just about the end product; it’s about the experience. The thrill of dipping a stone into swirling colors can be both calming and exhilarating. It invites you to lose yourself for a moment, to play with color and design without the pressures of perfection. Plus, the satisfaction of creating something uniquely yours is unmatched.
These glossy little gems have a multitude of uses: brighten up your desk space, leave thoughtful gifts for friends and family, or even enhance the beauty of your garden with nature-inspired decor. Each stone tells a story, reflecting your color choices and the whimsy of the moment. Imagine giving a set of these stones as a gift—a handmade token that carries both love and creativity.
The Joy of Crafting: Benefits and Best Occasions for Marbled Stones
So why should you dive into this marbling journey? Well, aside from the obvious aesthetic appeal, crafting can be a meditative practice. It encourages mindfulness, helps alleviate stress, and fosters a sense of accomplishment.
Best occasions to showcase your marbled river stones include:
- Seasonal Celebrations: Decorate tables or gift them as party favors during holidays.
- Weddings: Use them as place markers or unique decor elements.
- Housewarming Gifts: Create a personalized touch for friends moving into a new home.
- Mindful Mondays: Make them during a cozy crafting session with friends to start the week off on a creative high.
Gathering Your Materials
As we embark on this marbled adventure, let’s gather our materials. Here’s what you’ll need. Each item plays a crucial role in transforming ordinary river stones into extraordinary pieces of art:
- Smooth River Stones: Look for stones that are clean and dry. Their size and shape can vary, allowing you to create a delightful assortment.
- Clear Glass Bowl: This will be your canvas. A large and deep bowl is preferable to allow the nail polish to spread easily.
- Water: Keep it at room temperature—too hot and the polish sets too quickly, too cold and it won’t spread nicely.
- Nail Polish: Choose vibrant colors that inspire you—purple, pink, turquoise, and metallic silver make stunning combinations.
- Toothpick or Wooden Skewer: This will help swirl the colors into beautiful patterns.
- Paper Towels: Handy for drying off your stones and cleaning up.
- Gloves (optional): If you want to keep your hands pristine while crafting, but the mess can be part of the fun!
Step-by-Step Instructions: Your Marbled Stone Journey
Now, let’s get our hands a little messy! Follow these steps to create your marbled river stones.
Step 1: Prepare the Water Bowl
Fill your glass bowl with room-temperature water. Try to keep the surface still; we’re aiming for a perfect canvas of calm water.
Step 2: Create the Marble Pattern
With your bowl ready, it’s time to unleash the colors. Let small drops of nail polish fall onto the water surface. Watch as the polish spreads into delicate rings. Don’t be shy—layer different colors to create a complex pattern.
Step 3: Swirl the Design
Here comes the fun part! Grab your toothpick or skewer and gently drag it through the floating polish. Move across the surface, creating swirls, spirals, or abstract designs. Enjoy this creative expression but remember, time is of the essence—polish can start to set quickly!
Step 4: Dip the Stone
Now for the magic! Hold a clean, dry river stone at an angle and slowly dip it into the patterned polish. Allow it to fully immerse, then lift it up delicately. Observe the stunning patterns unfolding on your stone.
Step 5: Let It Dry
Place your beautifully coated stone on a paper towel or a clean surface to dry. The drying time will depend on how thick your polish layer is—typically around 30 to 60 minutes. Patience is key here!
Step 6: Repeat (Optional)
The process is so much fun that you might want to keep going! Experiment with different colors and techniques for each stone.
Helpful Tips for the Best Results
- Work Quickly: Nail polish can dry fast, especially in warm environments. Have everything prepared before you start.
- Test First: Practice with some less-polished stones or even paper to see how the colors interact before you dive into your final designs.
- Layer It Up: For a more complex look, try creating layers by dipping the stone into different patterns or by doing multiple dips.
Common Mistakes to Avoid
Crafting is a delightful adventure, but like any journey, it may have a few bumps. Here are some common beginner mistakes and solutions:
- Too Much Polish: Adding too much nail polish can result in heavy, drippy designs. Start with small amounts and build up.
- Rushing the Swirl: Don’t rush through swirling the polish. Take your time to create designs that feel right to you!
- Skipping the Drying Stage: Allow your stones ample time to dry to avoid smudging.
Creative Variations
Once you’ve mastered the basics, consider getting playful with your designs. Use metallic nail polish for an elegant shimmer, or incorporate glitter for a festive vibe. Try using a spray sealer once your stones are dry for added shine and resilience.
Serving and Presentation Ideas
Once your marbled stones have dried, think about how you’ll display them. A beautiful bowl on a coffee table can serve as both decor and a conversation starter. Place them within your garden as whimsical accents or arrange them on bookshelves to add a splash of color to your home.
Frequently Asked Questions
Can I use any type of nail polish?
While most nail polishes will work, opt for quick-dry formulas for the best results.
How can I seal my stones for outdoor use?
Consider using a clear acrylic spray to protect them from the elements.
What if I don’t have river stones?
Smooth pebbles from a craft store can be a delightful alternative.
An Artful Conclusion
As the last rays of sunlight dance upon your freshly created marbled river stones, take a moment to appreciate the colors swirling alongside the stories they tell. This crafting adventure was not just about creating beautiful art, but nurturing connections and embracing creativity. Whether gifted or kept, each stone captures a memory, a moment of joy.
You’ve transformed simple river stones into glossy masterpieces that reflect who you are. So, gather your materials, invite a friend or two to join, and let the magic of marbling inspire many joyful afternoons. Now go forth and let your creativity flow!
SEO Meta Description: Discover the enchanting DIY process of creating marbled river stones using a simple water-transfer nail polish technique. Perfect for home decor, gifts, or crafting enjoyment!
SEO Tags: DIY, marbled river stones, crafting, home decor, nail polish art, creative projects, handmade gifts