
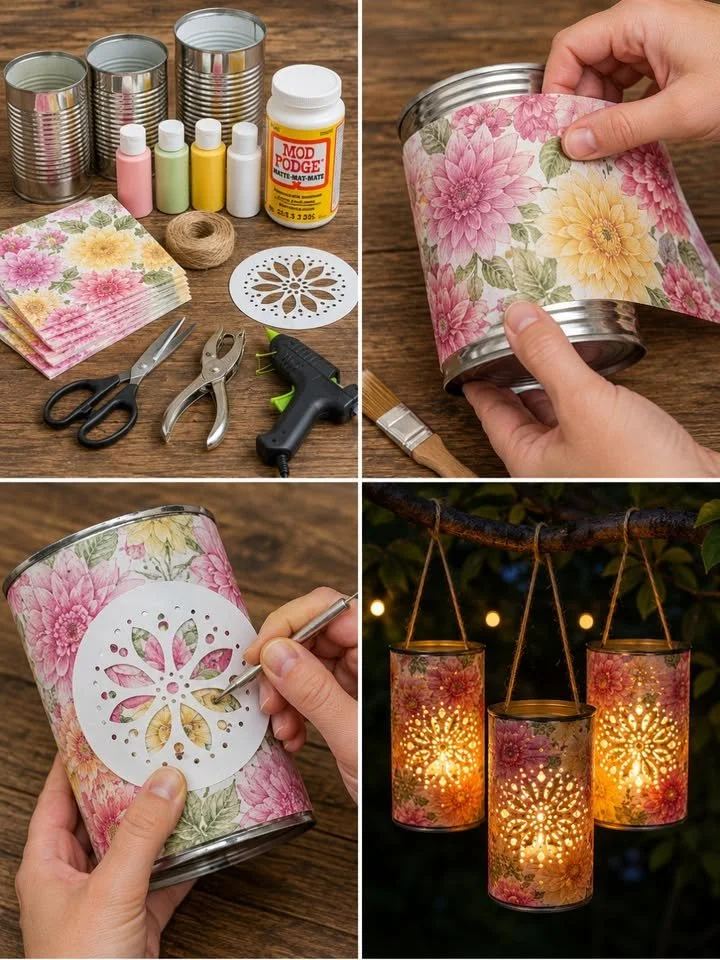
DIY Floral Tin Can Lanterns
Cozy Nights and Glowing Lights: Crafting DIY Floral Tin Can Lanterns
As the sun sets and twilight descends, your backyard transforms into an enchanting retreat, filled with laughter and the sound of clinking glasses. Picture the scene: friends gathered around, their faces aglow with warm candlelight, surrounded by your handmade creations—rustic, whimsical lanterns swaying gently in the crisp evening breeze. These charming DIY floral tin can lanterns are not just a decorative piece; they are little vessels of joy, embodying creativity and warmth, perfect for summer nights under the stars.
With every flicker of light spilling through floral cutouts, memories are woven into the fabric of each gathering. Let’s explore how to turn simple tin cans into these captivating pieces of art that elevate any outdoor setting from ordinary to extraordinary.
The Allure of DIY Lanterns
So, why do we adore these rustic floral tin can lanterns? They are more than just a lighting solution; they are a canvas for self-expression and creativity. Perhaps you’ve been to an outdoor event lit by gentle glows of lanterns, or maybe you’ve wanted to create a special ambiance in your garden. This project weaves a bit of magic into your space, allowing you to share an experience that’s personal and intimate.
They serve as a perfect centerpiece for evening get-togethers, add charm to garden parties, or can simply be an artful statement in your own backyard. The beauty of these lanterns lies in their simplicity—transforming ordinary materials into stunning decor that resonates a sense of warmth and welcome.
A Glow of Benefits and Occasions
Imagine hosting a summer barbecue or a cozy family gathering. The soft flicker of your DIY lanterns creates a tranquil vibe that draws everyone together, encouraging laughter, storytelling, and connection. Not only are these lanterns visually stunning, but they also offer sustainable lighting solutions: using LED candles means you don’t have to worry about safety while still enjoying that beautiful, inviting glow.
These lanterns also shine bright as wedding decorations, holiday displays, or delightful craft projects to involve your children in creative play. Each occasion becomes a cherished memory, marked by the glow of your handmade luminaries.
Gathering Your Crafting Materials
Embarking on this delightful crafting adventure requires a handful of simple materials that you may already have at home. Here’s what you’ll need:
- Metal Tin Cans—Three empty, clean cans, label-free.
- Floral Paper Napkins or Decorative Tissue Paper—Choose designs that inspire you.
- Mod Podge (or Decoupage Glue)—For sealing your floral designs.
- Paintbrush or Sponge Brush—To apply the glue smoothly.
- Acrylic Paints—Optional base coats in soft pastel shades (pink, yellow, green, white).
- Paper Stencil with Floral Cutout Design—Your chosen stencil will guide your perforations.
- Push Pin, Nail, or Metal Stylus—For carefully punching holes into your design.
- Scissors—To trim your napkins and paper.
- Jute Twine—For creating a hanging element.
- Tea Light or LED Candles—Your light source for a safe yet warm glow.
Crafting Your Lanterns: A Step-by-Step Guide
Now that you have everything ready, let’s dive into the delightful process of creating your floral tin can lanterns. Grab your materials, gather around a table, perhaps with some music playing softly in the background, and enjoy the process!
Step 1: Prepare the Cans
Begin your crafting journey by washing your tin cans thoroughly; make sure to remove any labels and dry them completely. Take a moment to smooth out any sharp edges to ensure safety while handling.
Step 2: Apply the Floral Design
Take your Mod Podge and, using a paintbrush, apply a thin layer on the outside of your can. Carefully wrap the floral napkin around the surface, smoothing out any wrinkles as you go. This part is where the magic truly begins! You can play with overlapping layers for added depth and richness. Once you’ve secured your napkins in place, seal the design with another light coat of Mod Podge and let it dry completely.
Step 3: Add Decorative Stenciling
Once everything is dry, it’s time to add the enchanting floral details. Place your floral stencil over the decorated can; using your stylus or push pin, gently punch small holes along the design to create a perforated pattern. This step allows the soft light of your candle to flicker through the floral motifs, casting playful shadows around your space.
Step 4: Reinforce and Dry
For the best results, allow your cans to dry completely for several hours. This ensures that the paper and glue bond well, reinforcing your beautiful designs for many evenings to come.
Step 5: Add Hanging Twine
Next, take your jute twine and wrap it around the top rim of the can, creating a couple of loops for hanging. As you do this, envision where you would like to display your lanterns—a cluster hanging from tree branches, or perhaps adorning your dining table.
Step 6: Insert Light Source
The best part arrives! Place either a tea light or LED candle inside each decorated can. If you opt for LED candles, you can set the ambiance without worrying about open flames—perfect for outdoor settings.
Step 7: Display Your Lanterns
Now, step back and admire your handiwork! Hang them from branches, place them on tables, or line pathways with your glowing creations. Watch as they transform your outdoor space into a magical, inviting haven.
Tips and Tricks to Elevate Your Lanterns
Here are a few tips from my crafting adventures:
- Mix and Match Designs: Use a variety of floral napkins for multiple lanterns. This creates a beautiful, eclectic look.
- Play with Color: Consider painting your cans in pastel shades for an additional layer of texture before applying your floral designs.
- Don’t Rush the Drying Process: Taking your time allows for the best adhesion and overall longevity of your lanterns.
Avoiding Common Pitfalls
While this is a straightforward project, here are a couple of common mistakes to steer clear of:
- Rushing the Drying Stage: Allowing your Mod Podge to dry completely is crucial; otherwise, your lanterns may fall apart.
- Ignoring Sharp Edges: It’s easy to overlook hidden sharp edges on tin cans. Make sure to carefully check and smooth any rough areas.
Creative Variations to Make It Your Own
Feeling adventurous? Here are some creative variations to personalize your lanterns even more:
- Theme it Out: Align your designs with the season—a winter wonderland theme with snowflakes for a cozy winter gathering or vibrant tropical blooms for summer soirees.
- Add Glitter: A touch of glitter around the top rim can add extra sparkle, particularly for evening events.
- Scents and Aromas: If using real candles, consider adding scented tea lights for a multi-sensory approach.
Displaying Your Lanterns with Style
Once finished, think about how to display your beautiful creations. Group them together on a table, hang them from a pergola or tree branches, or even create a light path along your garden walkway. Each lantern should radiate its charming glow, enhancing the ambiance and inviting your guests to linger a little longer.
Frequently Asked Questions
- Can I use non-floral designs? Absolutely! Feel free to explore different patterns that resonate with your style.
- How long do these lanterns last? With proper care, these lanterns can adorn your space throughout many seasons.
- What is the best way to clean them? Gently wipe with a damp cloth. Avoid soaking them in water to preserve the designs.
A Glowing Conclusion
As your gathering unfolds under this glowing tapestry of light, let the warmth from your handmade floral tin can lanterns permeate the air, beckoning everyone to share in delightful conversations and cherished moments. With each flickering candlelight, you create an atmosphere woven with the threads of creativity and shared laughter.
This is more than just a craft—it’s a way to bring joy and beauty into your life and those around you. Get inspired, roll up your sleeves, and let the art of crafting illuminate your evenings, reminding us all that simple things can create the most profound effects.
SEO Meta Description
Discover the charm of DIY floral tin can lanterns in this step-by-step guide! Transform ordinary tin cans into glowing garden lights perfect for cozy evenings and special gatherings.
Suggested SEO Tags
- DIY Lanterns
- Crafting Projects
- Outdoor Decor
- Lighting Ideas
- Candle Lanterns
- Garden Crafts
- Home Decor Ideas