
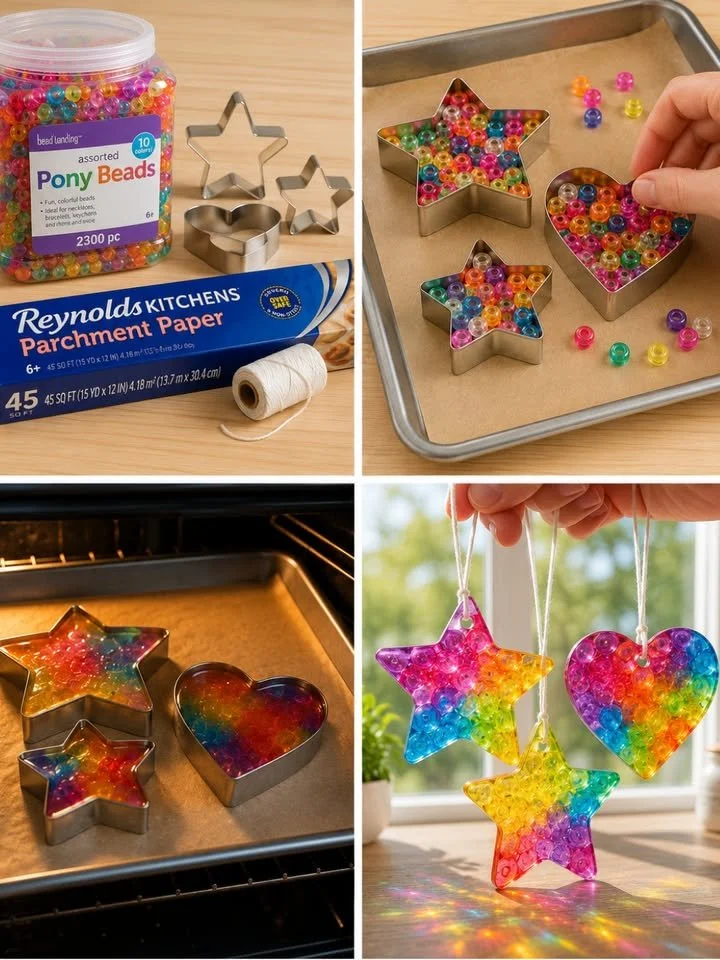
Melting Bead Suncatchers (DIY Window Art)
Melting Bead Suncatchers: Crafting Glowing Rainbow Window Art
As sunlight streams through your window, creating a dazzling prism of colors on the hardwood floor, laughter fills the air, echoing the warmth of another beautiful afternoon spent crafting. Imagine a cozy corner filled with the intoxicating energy of creativity. Children with colorful pony beads scattered around, giggling as they fill cookie cutters, their little fingers deftly arranging the beads into bright patterns of joy. This is the magic that comes with making melted bead suncatchers—a simple yet enchanting DIY project that transforms an ordinary day into an extraordinary one.
There’s something undeniably captivating about suncatchers, particularly those that you craft yourself. They not only add bursts of color to your home but also reflect the happiness and creativity of the moment you spent making them. Whether you’re an artistic soul or a total novice, creating these pieces is more than just a project; it’s an opportunity to connect, create, and bask in the beauty of light and color.
Why People Love Suncatchers
It’s the color that draws people in—the promise of light dancing through shades of pink, blue, yellow, green, and orange. Suncatchers aren’t just pretty window art; they embody the spirit of playful afternoons. The tactile nature of arranging beads and watching them melt into a silky, smooth shape provides more than just visual delight. It sparks conversation among friends and family, ignites creativity in children, and rekindles the joys of simple pleasures in adults.
This project is so appealing not only for its aesthetic rewards but also for its emotional satisfaction. The shared experience of making something together creates lasting memories. These suncatchers serve as a reminder of a sunny day spent laughing, crafting, and creating something beautiful. Every time you glance at them dancing in the sunlight, you’re reminded of the joy shared and the creativity unleashed.
Occasions to Embrace the Beads
Melted bead suncatchers are perfect for a range of occasions. Rainy day crafts? Check. Summer afternoons spent with friends? Definitely. This project also makes a delightful activity for birthday parties, holiday gatherings, or even school events. The best part? They can be personalized to suit any theme or individual preference. Think heart-shaped suncatchers for Valentine’s Day or star-shaped ones for a DIY astronomy night!
The Delightful Ingredients
Before you get started, let’s gather your supplies—all friends in this colorful journey:
- Assorted translucent pony beads: Focus on vibrant hues like pink, blue, yellow, green, and orange. This variety will ensure that your suncatchers burst with light and color.
- Metal cookie cutters: Shapes like hearts, stars, or circles work beautifully. Choose shapes that resonate with you or your child’s interests.
- Parchment paper: This is essential for preventing beads from sticking to the tray.
- Baking sheet or metal tray: A flat surface to hold your creations while they bake.
- Cotton twine or fishing line: A simple and elegant way to hang your completed suncatchers.
Creating Your Colorful Art
Ready to dive into this colorful adventure? Here’s a step-by-step guide on how to create your melted bead suncatchers:
-
Preheat Your Oven: Begin by heating your oven to 375°F (190°C). The anticipation of the melting beads will make this first step exhilarating!
-
Prepare the Baking Sheet: Line a baking sheet with parchment paper, smoothing it out to avoid any bumps. This will be your canvas.
-
Arrange the Cookie Cutters: Place your metal cookie cutters flat on the lined baking sheet.
-
Fill It Up: Carefully fill each cutter with a single layer of pony beads. Let your creativity flow as you arrange the colors—there’s no right or wrong way! Just ensure there are no gaps, as this will lead to a solid piece.
-
Bake to Perfection: Place the tray in the oven and watch as the beads begin to melt, fusing themselves together into a beautiful, colorful disc. The melting process will take about 20-25 minutes; it’s mesmerizing to watch as the shapes transform.
-
Cooling Down: Once you’ve removed the tray from the oven, let it cool for 30-60 minutes. It’s important to allow the beads to harden completely.
-
Pop It Out: With gentle hands, carefully remove the cooled shapes from the cookie cutters. This is a satisfying moment, revealing the vibrant suncatchers you’ve crafted.
-
Hang It Up: Thread cotton twine through the top of your suncatcher or tie it for a more secure finish. This will allow your creation to catch the sunlight beautifully when hung in a window.
Helpful Tips for a Successful Project
- Be Selective with Beads: Choose only translucent beads. Opaque beads won’t have the same lovely quality of light passing through them.
- Experiment with Shapes: While classic shapes work wonderfully, don’t hesitate to explore unconventional ones—perhaps an animal shape or even letters for a customized touch!
- Proximity Matters: Place suncatchers where they’ll be loved! A bright sunny window considered will allow the full range of colors to twist and turn with the sunlight.
Common Pitfalls to Avoid
-
Skipping the Layer: Filling your cookie cutter with more than a single layer of beads can lead to unforeseen problems. The beads might not melt properly, affecting the overall aesthetic of your project.
-
Underbaking: Ensure the beads are fully melted into a smooth (not liquid) consistency before pulling them out. A little extra patience goes a long way!
-
Handling Before Cooling: Resist the urge to rush; letting them cool completely will ensure they won’t warp or break.
Creative Variations
Feeling adventurous? Here are some creative twists to elevate your suncatcher-making:
- Mix Different Bead Types: Try incorporating other types of beads, such as clear glass or pearl beads, for variations in texture.
- Layered Designs: After your first layer of beads has cooled, consider adding more layers for added depth.
- Seasonal Colors: Craft suncatchers that reflect the season—warm oranges and reds for fall, icy blues and whites for winter, and pastels for spring.
Hanging and Display Ideas
Once completed, these charming suncatchers should be hung where they can truly shine. Consider:
- Placing them near a window that receives direct sunlight throughout the day.
- Grouping several suncatchers together at varying heights to create a delightful display.
- Using them as decorative elements for seasonal decorations—it’s a beautiful way to reflect the vibrant energy of each holiday.
Frequently Asked Questions
Q: How long will my suncatchers last?
A: With proper care, your suncatchers should last for years. Keep them away from extreme heat or direct flame to maintain their integrity.
Q: Can I use regular beads instead of pony beads?
A: It’s best to stick with translucent pony beads or approved meltable beads to achieve the desired melting effect.
Q: What if I want to remove a suncatcher from the mold and it’s stuck?
A: If your bead suncatcher is stuck, gently run a thin knife around the edge to release it without damaging the shape.
A Lasting Impression
As the light dances through your handmade suncatchers, it brings a sense of joy and an array of colors into your home. Each afternoon spent crafting these pieces becomes woven into your memories, igniting creativity and laughter, strengthening bonds, and creating unique art that holds more than just colors. It tells a story of joyful afternoons, shared experiences, and the radiant beauty found in simplicity.
So gather your loved ones, pull out those beads, and let the sunlight guide your creative journey. There’s no telling how many dazzling memories you’ll make by simply melting a few beads together. Happy crafting!