
Transform Your Garden: How to Create a Stunning CD Mosaic Flower Pot
Transform Your Garden: How to Create a Stunning CD Mosaic Flower Pot
Imagine a sun-soaked afternoon where laughter fills the air, children scratch their heads in wonder, and the scent of freshly cut grass wafts through open windows. You sit on your patio, surrounded by a chorus of blooming flowers and rustling leaves, feeling an unshakeable sense of connection to nature. And there, in the corner of your garden, stands a delightful little creation, a flower pot that shimmers in the sunlight, telling its own unique story. This story is crafted from old CDs, capturing both nostalgia and creativity—a CD Mosaic Flower Pot.
This project not only breathes new life into your old media but also adds a touch of whimsy and enchantment to your garden. With just a few materials and a sprinkle of creativity, you can create a functional piece of art that serves as the home for your favorite plant while standing as a testament to your artistic flair. Let’s embark on a journey to unlock the potential of those forgotten discs and turn your garden into a vibrant sanctuary.
The Allure of the CD Mosaic Flower Pot
You might wonder, what makes the CD Mosaic Flower Pot so captivating? For many, it’s not just about the beauty of the design; it’s the thrill of reimagining everyday objects into something extraordinary. Every glimmering shard of a CD reflects light differently, creating a soft kaleidoscope effect that dances with the sun. It’s a project that whisks us away on a delightful trip down memory lane while connecting us to nature.
The act of crafting is therapeutic, offering a creative escape amidst the hustle and bustle of daily life. As you cut and assemble, you’ll find that your worries fade, replaced by the excitement of watching your vision take shape. Plus, utilizing recyclable materials is not only eco-friendly but tells an enchanting narrative of transformation. Who wouldn’t love to showcase a conversation starter that marries art and sustainability so beautifully?
Why You Should Try This Project
Creating a CD Mosaic Flower Pot is more than just a DIY project. It is a celebration of creativity and sustainability, making it a perfect activity for families or anyone looking to add color and personality to their outdoor space. This project resonates most during spring and summer, when flowers blossom and gardens flourish. Imagine hosting a garden party, where your mosaic pot shines amidst the greenery, or gifting a personalized creation to a loved one.
You can use this project to educate children about recycling while engaging their creativity, which makes it an excellent choice for family craft days. Plus, DIY gardening projects are a marvelous way to express personal style, letting you showcase your passions in a way that store-bought items simply can’t match.
Materials You Will Need
Let’s gather what you need for this project, ensuring each item complements the creative vision you’re about to realize:
- Terracotta Flower Pot: Opt for a medium-sized pot; its earthy color provides a fantastic contrast against the colorful mosaic pieces.
- Old CDs or DVDs: Gather enough to fully cover the pot; choose various colors and patterns to maximize uniqueness.
- Strong Craft Scissors: The sharper the scissors, the easier it will be to cut through the CD material.
- School Glue or Mosaic Adhesive: Look for a strong adhesive designed for ceramics or glass to ensure your pieces stick well.
- Black and White Acrylic Paints: These colors will help you achieve that stunning stained-glass effect.
- Small Paintbrush: A small brush permits precision work, particularly when applying paint.
- Soft Cloth: This will be useful for wiping away excess paint.
- Potting Soil and Plant/Succulent: Choose your favorite plant—a succulent can be an excellent choice due to its low maintenance.
Step-by-Step Instructions
With your materials gathered, it’s time to dive into the artistic process! Picture yourself serene, your hands busy with creative intention.
Step 1: Clean and Dry Your Pot
Ensure your terracotta pot is clean and dry. A freshly washed pot provides a lovely canvas for your artistry. If you notice any dust or dirt, give it a good rinse and let it bask in the sunlight until it’s completely dry.
Step 2: Cut the CDs
Now comes the satisfying part. With your scissors, cut each CD into small triangles and squares. The crinkle of the plastic as it snaps under the pressure will be music to your ears. The goal is to create a variety of shapes that lend dimension to your design. As you snip away, recall the memories tied to these disks—your favorite movies, concert recordings, or family celebrations frozen in time.
Step 3: Glue the Pieces
Using school glue or mosaic adhesive, start arranging your CD pieces around the pot. Aim for an artistic look, leaving small gaps between each piece; this is where the real magic happens later. Use your fingers to press and secure each piece, watching as the pot transforms into a glistening canvas.
Step 4: Allow to Dry
Patience is key here. Follow the adhesive instructions about drying time and carefully place your pot in a safe spot where it won’t be disturbed. You’ll soon see your hard work pay off.
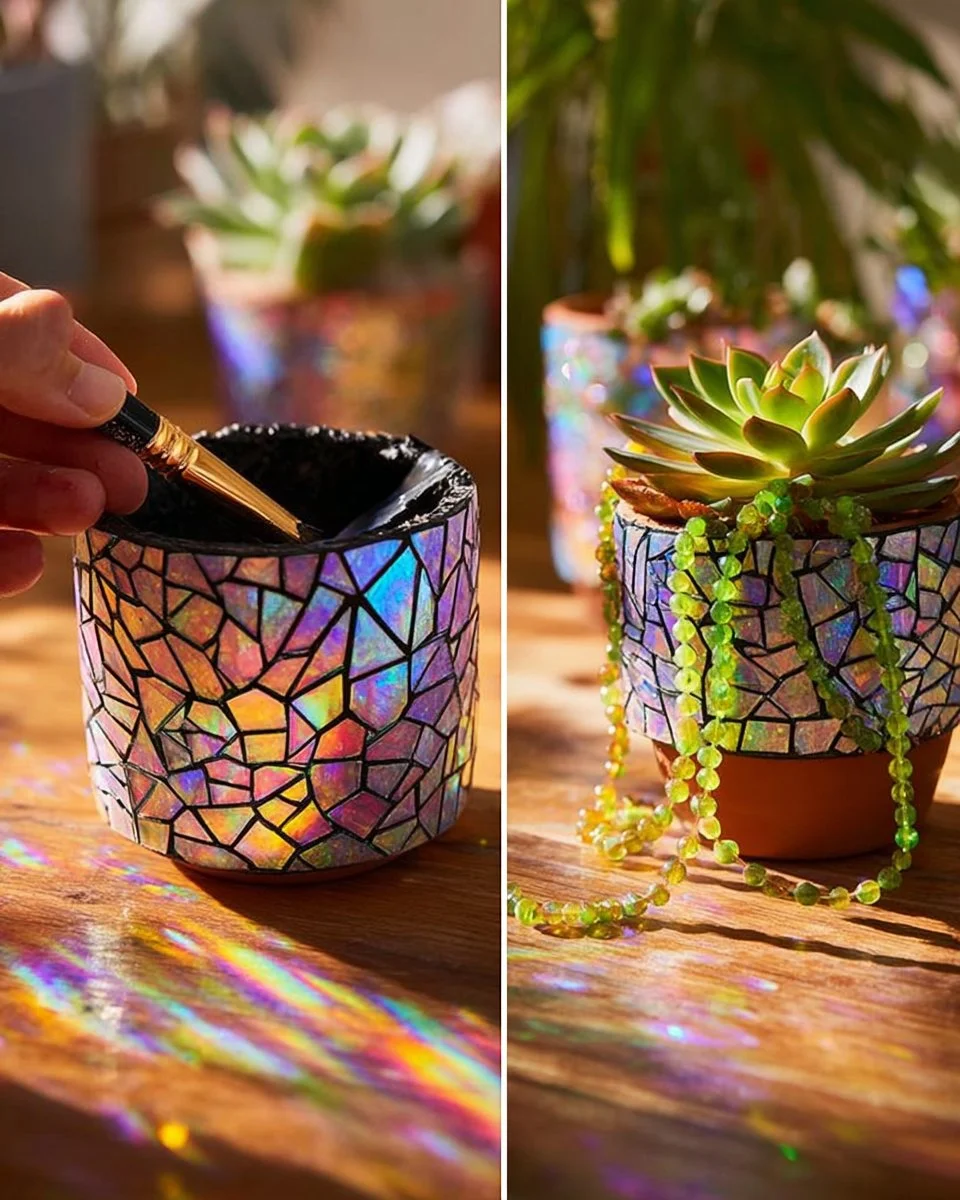
Step 5: Paint for Stained-Glass Effect
Next, take your black acrylic paint and mix it with a bit of water—it will create a wonderful transparent effect. Lightly brush the mixture over the surface, allowing it to seep into the gaps. As the paint flows, marvel at how your creation begins to resemble a shimmering stained glass piece.
Step 6: Wipe Away the Excess
Grab your soft cloth to remove any excess paint. The goal is to enhance those gaps while keeping the mosaic pieces sleek and shiny. Enjoy the tactile experience of wiping away the paint, revealing the colors and reflections below.
Step 7: Complete Your Creation
Once it’s fully dry, fill your new pot with potting soil and plant your chosen succulent. As you place the plant into its new home, feel the satisfaction of seeing your vision fully realized. Your gorgeous mosaic flower pot now stands ready to bring joy to your garden.
Helpful Tips and Common Mistakes to Avoid
To ensure your crafting experience is as enjoyable as possible, here are a couple of tips. Do wear safety glasses while cutting CDs to protect your eyes from shards. Also, consider using a variety of shapes in your mosaic—this not only prevents monotony but also adds to the visual intrigue.
Don’t rush the drying process; it can be tempting to push ahead, but allowing each layer to dry completely will enhance durability and appearance. A common mistake is using too much glue or paint, leading to drips and an uneven finish.
Creative Variations
Feel free to let your imagination soar. You might choose to add embellishments like beads or colored stones to your mosaic to personalize it further. Alternatively, consider using glow-in-the-dark paint for an enchanting nighttime spectacle! If you’re feeling particularly adventurous, you can even create a whole set of pots in varying sizes or themes to create a cohesive garden display.
Presentation and Decoration Ideas
Your CD Mosaic Flower Pot isn’t just about inner beauty; it has a story to tell. Place it in a sunny spot where it catches the eye—and the light. It could serve as a centerpiece for a garden party or a whimsical welcome on your front porch. Pair it with a rustic wooden table, and beautifully arrange a few smaller pots around it to create an intimate garden scene.
Maintenance Tips
To keep your mosaic in prime condition, ensure it’s treated well by selecting an outdoor clear sealer after it dries fully. This will protect the pot from the elements, ensuring your crafting masterpiece remains beautiful through the seasons.
As for your plant, regular watering and placing it where it can soak up sunlight will keep it happy and healthy, making your mosaic pot an enchanting addition to your garden for years to come.
Frequently Asked Questions
Can I use other types of pots?
Absolutely! While terracotta is ideal due to its porous nature, you can experiment with ceramic or even plastic pots. Just be sure to choose an adhesive that bonds well to the material.
What if I don’t have old CDs?
Consider visiting thrift stores or checking with friends for old disks. Alternatively, you could use colorful tiles or broken pottery to achieve a similarly stunning effect.
How do I care for the plant?
Ensure it receives adequate sunlight, depending on the type of plant. Succulents typically thrive in bright, indirect light and appreciate occasional watering—avoid overwatering as this could lead to root rot.
Final Thoughts
As the sun dips below the horizon, casting a soft golden glow on your CD Mosaic Flower Pot, you can’t help but feel a swell of pride. Each piece reflects a happy memory, each daub of paint tells a story, and the succulent within breathes life and greenery into your space. This isn’t merely a project; it’s a beautiful reminder of the power of creativity and the joy of transforming the ordinary into the extraordinary.
So gather your materials, channel your inner artist, and create a reflection of yourself that dazzles and delights. Your garden deserves it, and so do you. Happy crafting!
SEO Meta Description
Transform old CDs into stunning art with our step-by-step guide to creating a CD Mosaic Flower Pot. Perfect for adding flair to your garden!
Suggested SEO Tags
- CD Mosaic Flower Pot
- DIY Garden Projects
- Upcycled Crafts
- Home and Garden Decor
- Creative Gardening
- Succulent Planters
- Eco-Friendly Crafts