
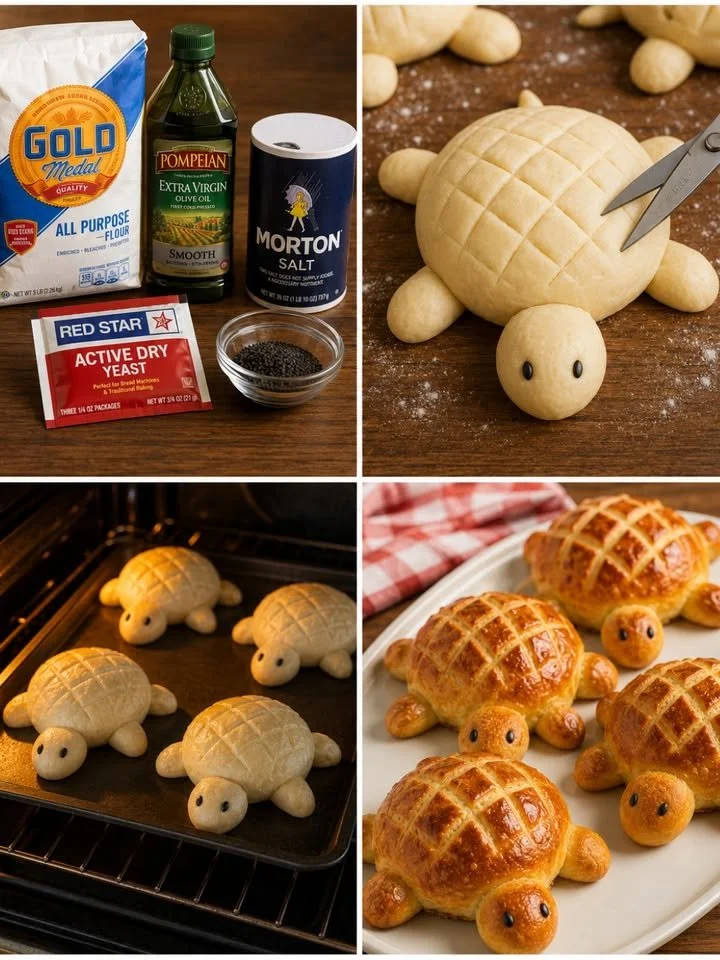
Turtle Bread Rolls
Turtle Bread Rolls: The Adorable Family Bread That Steals Hearts
Picture this: a cozy family dinner setting with laughter echoing off the walls, the warm aroma of fresh bread wafting through the air, and an adorable platter of turtle-shaped bread rolls at the center of the table. These little guys not only capture the hearts of children but also bring smiles to adults, sparking nostalgia for family baking days and gatherings. Turtle bread rolls, with their charming design and deliciously fluffy texture, have a unique ability to transform a simple meal into a whimsical experience.
Why We Love Turtle Bread Rolls
What makes turtle bread rolls so irresistible? Beyond their endearing shape, they boast a soft, cloud-like interior that begs to be torn apart and shared. The beautifully golden crust adds a warm, inviting touch, making them perfect for dipping into soups, serving alongside festive dinners, or simply enjoying with butter. The process of shaping each roll is a delightful activity that brings families together, inspiring creativity in the kitchen while also instilling a sense of accomplishment when they see their goofy turtle creations come to life.
These tender rolls aren’t just about looks; they offer a multitude of flavors from the golden crust to the soft center. The subtle richness of olive oil pairs harmoniously with the hint of sweetness from the sugar, making each bite feel like a warm hug. Whether you’re hosting a family gathering, a kid’s birthday party, or just looking for a fun baking project, turtle bread rolls can elevate any occasion.
Perfect Occasions to Bake Turtle Bread Rolls
From casual weeknight dinners to festive celebrations, turtle bread rolls can complement a variety of themes and cuisines. Imagine serving them at Easter brunch, their little heads peeking over a bed of greens as a playful centerpiece. Or consider making them for a family game night, bringing everyone together for a starchy shared joy.
They’re also perfect for showcasing at potlucks, adding a unique flair to the usual bread basket. The cuteness factor means they’ll draw attention, and believe me, people will ask about your treasured recipe. For a family with young kids, these rolls offer not only a fun culinary activity but also a delightful treat to enjoy afterward.
The Ingredients: Simple Yet Delightful
Creating these charming turtle bread rolls requires only a handful of simple ingredients, but the magic lies in how they come together. Here’s what you’ll need:
- 3½ cups all-purpose flour: The foundation of your rolls, creating that soft texture we all adore.
- 2¼ teaspoons active dry yeast (1 packet): This tiny powerhouse is essential for creating fluffiness.
- 1 cup warm water (110°F/45°C): The water activates the yeast, ensuring a beautiful rise.
- 2 tablespoons olive oil: This adds moisture and a hint of flavor to your bread.
- 1 tablespoon sugar: A subtle sweetness that balances the flavors perfectly.
- 1 teaspoon salt: Enhances the savory notes in the rolls.
- 1 egg, beaten (for egg wash): Provides that stunning golden crust.
- Black sesame seeds for the eyes: These little details bring your turtles to life.
Crafting Your Turtles: Step-by-Step Instructions
Baking turtle bread rolls is a delightful process that blends the art of bread-making with creativity. Here’s a lovingly detailed method to guide you through every step:
-
Activate Your Yeast: Begin by combining the warm water, sugar, and yeast in a large mixing bowl. Allow it to sit for about 5-10 minutes until it becomes foamy—this means your yeast is alive and ready to work its magic.
-
Mix in the Goodness: Once foamy, stir in the olive oil and salt. These ingredients enhance the dough’s flavor, making each roll taste more than just delightful.
-
Add the Flour: Gradually incorporate the all-purpose flour, mixing until a shaggy dough forms. Now it’s your turn to knead. Toss the mixture onto a lightly floured surface and knead for about 8-10 minutes. You’ll know it’s ready when the dough is smooth and elastic to the touch.
-
Let It Rise: Place your beautifully kneaded dough in a lightly oiled bowl, cover it with a clean kitchen towel, and let it rise in a warm, undisturbed spot for about 1 hour, or until it has doubled in size. This delightful moment is when the real magic happens.
-
Shape the Turtles: Once risen, gently punch down the dough to release any trapped air. Divide it into four larger pieces for the turtle bodies, and set aside smaller pieces for the heads, legs, and tails. The shaping process is where creativity takes the lead. Form each turtle by attaching a smaller piece to the large ball of dough, ensuring they feel snug and secure.
-
Add Character: Use kitchen shears to snip a crosshatch pattern across each turtle’s shell, giving them that signature turtle look. Carefully press two black sesame seeds into each head for the adorable eyes. It’s these little touches that truly bring your turtles to life.
-
Final Rise: Arrange your turtles on a parchment-lined baking sheet, cover them loosely, and let them rise once more for about 30 minutes. This final rise is essential for achieving that perfect fluffy texture.
-
Egg Wash and Bake: Preheat your oven to 375°F (190°C). Before baking, brush the tops of the turtles with the beaten egg wash; this will give them a gorgeous golden hue. Bake for 18-22 minutes, or until they are beautifully golden brown and your kitchen is filled with heavenly bread aromas.
-
Cool and Serve: Once baked, transfer them to a wire rack to cool slightly. Now they’re ready to be enjoyed, either fresh out of the oven or at the centerpiece of your dinner table.
Helpful Tips for Perfect Turtle Bread Rolls
- Kneading the Dough: Don’t rush this step. Proper kneading develops the gluten, leading to that desirable fluffiness.
- Temperature Matters: If your kitchen is cool, you might find a warm oven (turned off) works perfectly to help your dough rise.
- Watch the Baking Time: Every oven is different. Check your rolls a couple of minutes before the end of the recommended baking time.
Common Beginner Mistakes to Avoid
- Skipping the Rise Times: Patience is key when making bread. Allowing the dough to rise doubles its volume and creates the light texture we love.
- Under- or Over-kneading: Knead until the dough is elastic and smooth. Under-kneading results in dense bread, while over-kneading can make the dough tough.
- Not Using Warm Water: Cold water can shock the yeast and hinder rising. Ensure it’s just warm to the touch.
Flavor, Texture, and Presentation
As you bite into a warm turtle bread roll, you’ll experience an inviting outer crust that’s golden and slightly crisp, giving way to a soft, fluffy interior. The combination of textures is truly delightful, and they absorb any accompanying butter or spreads beautifully. You could even serve them warm with a side of honey or homemade herb butter to amplify their flavor.
Creative Variations to Try
Feeling adventurous? Here are a few creative spins on the turtle bread rolls:
- Herbed Turtles: Incorporate dried herbs such as rosemary or thyme into the dough for a savory twist.
- Cheesy Delight: Add shredded cheese into the center for a melty surprise when you break them open.
- Sweet Cinnamon Turtles: Sprinkle cinnamon sugar on top before baking for a sweet indulgence, perfect for breakfast or dessert.
Serving Ideas
Present your turtle rolls in a charming vintage basket lined with a cloth, or arrange them on a colorful platter amidst fresh herbs. These eye-catching creations will undoubtedly be the stars of your table.
Storing Your Turtles
If you’re lucky enough to have leftovers, place them in an airtight container and store them at room temperature for up to two days. For longer storage, you can freeze them. Just make sure they are completely cooled before wrapping them in plastic wrap and placing them in a resealable freezer bag.
Frequently Asked Questions
Can I use whole wheat flour instead?
Absolutely! You can substitute part of the all-purpose flour with whole wheat flour for a healthier twist, keeping in mind that this may affect the texture slightly.
What if I don’t have black sesame seeds?
No worries! You can use poppy seeds, chocolate chips, or even small pieces of olives for a fun effect.
Conclusion: Baking Fun Awaits
As you embark on the delightful journey of creating turtle bread rolls, remember it’s more than just baking; it’s about making memories. Whether you’re collaborating with little ones eager to wield dough in the kitchen or surprising your loved ones with a whimsical treat, these adorable rolls have a way of bringing joy and satisfaction. The anticipation as you watch them rise, the laughter shared while shaping each turtle, and the smiles that ensue as they are devoured—all form part of a cherished culinary experience.
So roll up your sleeves, gather your ingredients, and make those turtle bread rolls that will surely become a cherished family tradition. Enjoy every soft, fluffy bite and the happiness they bring!
Remember, life is too short for boring bread, so let’s get baking!
Meta Description: "Discover the joy of baking Turtle Bread Rolls! With a soft, fluffy interior and adorable shapes, these delightful rolls are perfect for family dinners or fun baking projects with kids."
Suggested SEO Tags:
- Turtle Bread Rolls
- Family Baking
- Cute Recipe Ideas
- Bread Baking Tutorials
- Kid-Friendly Recipes
- Fun Dinner Ideas
- Creative Bread Shapes